Distributed Training with PyTorch: complete tutorial with cloud infrastructure and code
Chapters
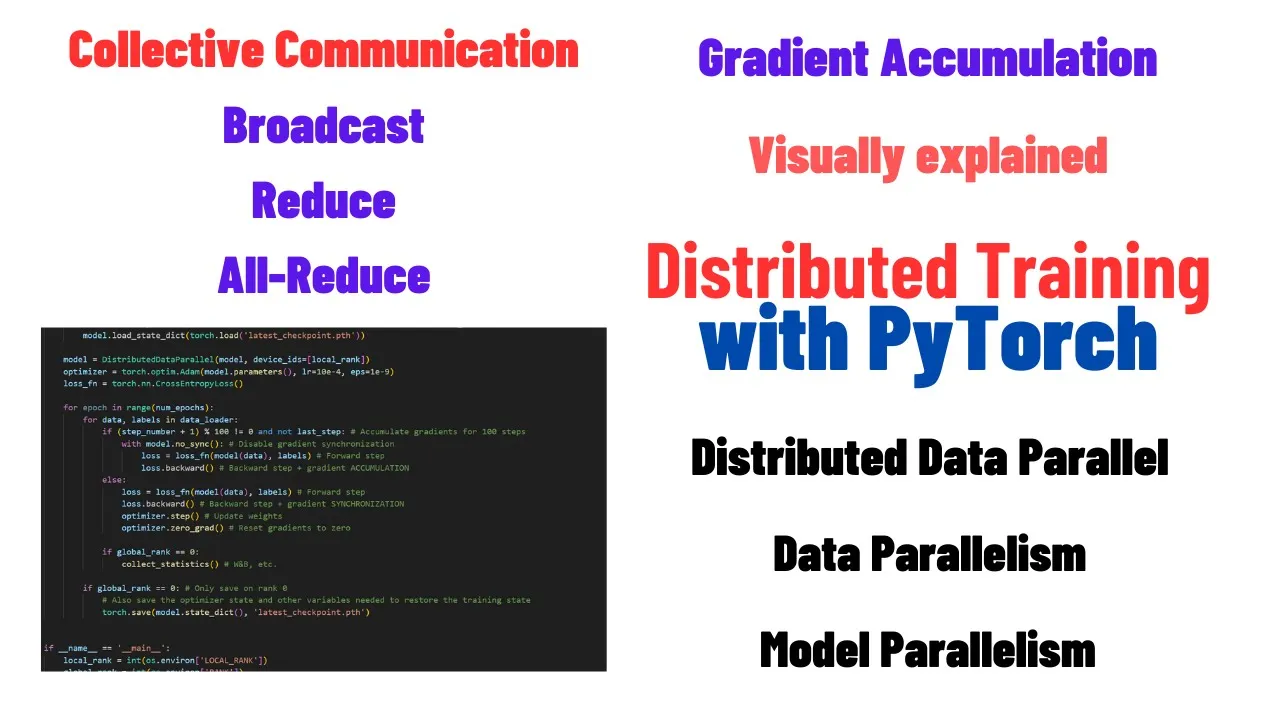
0:0 Introduction2:43 What is distributed training?
4:44 Data Parallelism vs Model Parallelism
6:25 Gradient accumulation
19:38 Distributed Data Parallel
26:24 Collective Communication Primitives
28:39 Broadcast operator
30:28 Reduce operator
32:39 All-Reduce
33:20 Failover
36:14 Creating the cluster (Paperspace)
49:0 Distributed Training with TorchRun
54:57 LOCAL RANK vs GLOBAL RANK
56:5 Code walkthrough
66:47 No_Sync context
68:48 Computation-Communication overlap
70:50 Bucketing
72:11 Conclusion
Transcript
Hello guys, welcome back to my channel. Today we are going to talk about the distributed training of a model with PyTorch. What do I mean? Well imagine you have a model that is very big and you have a lot of data upon which you want to train this model but it doesn't, it takes a lot of time to train it because maybe your GPU is not so powerful or maybe you cannot use a large batch size or just you have a lot of data to train this model and you want to train it in a reasonable time.
One way to do it is to parallelize the training on using multiple GPUs or even multiple computers, each one having multiple GPUs or even one GPU. In this video I will show you how this distributed training works, how to integrate it in your existing project and we will combine theory with practice which means that I will give you all the theory behind the distributed training and then also show you how to first of all build the cloud infrastructure to do cloud training of a model and also how to integrate the distributed training into an existing model that you have already built and it's maybe already training on a single GPU.
So let's review the topics of today. First of all I will give you an introduction to distributed training and show you the two ways in which we can do it. One is data parallelism and one in model parallelism. In this video I will explore data parallelism. We will see a little bit of the neural networks theory because I want to introduce a concept called gradient accumulation which is very important for distributed training and later we will see distributed training as it is built in PyTorch so distributed data parallel.
We will see how it works and I will also show you what we mean by communication primitives because maybe you have heard terms like all reduce, reduce broadcast, all gather etc but you maybe don't know what they are or how they work. In this video I will show you the algorithms upon which these operations are built and how they work when we talk about distributed training.
I will also show you how to manage failover of a node so imagine you are training on multiple nodes and one of the nodes suddenly dies how we manage this situation. We will do a little coding session I will not write code I will just take an existing code and show you how to add the distributed training to an existing model and I will be using a model that I built in a previous video so it's the video about the how to code a transformer model from scratch so if you have already watched my previous video on how to do it it's wonderful if you didn't it's not a problem because anyway the knowledge I will give you today applies to any model that you have built not only the one wrote by me and I will also show you the underlying mechanism in which PyTorch does distributed training so I will introduce you the computation communication overlap and the bucketing which are optimizations made in the PyTorch implementation of the distributed training and so we will explore all these topics.
Let's start our journey so let's start by introducing what is distributed training. Imagine you want to train a language model on a very big data set for example the entire content of wikipedia now the data set is quite big because it's made up of millions of articles and each article has maybe thousands of tokens to train this model on a single gpu may be possible but it poses some challenges first of all the model may not fit on a single gpu this happens when the model has many parameters this happens for example also with the latest llama they have billions of parameters and with so many parameters the ram of the gpu may not be enough or you are forced to use a small batch size because a bigger batch size leads to the out of error out of memory error on CUDA or the model may take years to train because the data set is very big if any of the above points applies to you then you need to scale up your training setup and scaling can be done vertically or horizontally let's compare the two options.
Vertical scaling means that you have a single machine for example a single gpu which has some ram and the gpu has some memory for example four gigabyte vertical scaling means that you just take the you just buy a bigger computer and or a bigger gpu so you take the existing machine and you upgrade the hardware and this requires no code change because the code that was running on the small machine can also run on the big machine you just maybe need to adjust a little bit of the parameters maybe you can increase the batch size now with horizontal scaling we have we go from a single machine to multiple machines each one interconnected with each other that are communicating for this parallelization training and each machine may have one or multiple gpus and this requires code change but this code is mean this code change is minimal thanks to pytorch and its implementation of the distributed data parallel and in this video we will explore horizontal scaling because vertical scaling basically we don't need to do anything the code there is no code change so there are two ways of distributing training of a model one is called the data parallelism and one is called the model parallelism so if the model can fit within a single gpu then we can distribute the training on multiple servers each one having one or more gpus with each gpus processing a subset of the entire data in parallel and synchronizing the gradients during back propagation this technique is known as data parallelism so we have one model that can fit within a single gpu and we have a lot of data what we do is basically we split this data into subsets and we train it on multiple computers in parallel such that each gpu is training on a subset of this entire data set if the model however cannot fit within a single gpu then we need to break the model into smaller pieces into smaller layers and each gpu process a part of the forward and the backward step during gradient descent this option is known as model parallelism so imagine this model initial model doesn't fit on a single gpu so we can break it into layers and each computer is managing a layer not the entire model and of course we can also combine data parallelism with model parallelism to create a hybrid option in this video we will focus on data parallelism so we pretend that we have a model that is complex but it can fit on a single gpu but we have a lot of training data and it's taking really forever to train it on a single computer so we want to distribute this training on multiple computers or multiple gpus such that each gpu will train on a subset of the data okay we need to review a little bit of the neural networks because i need to introduce a concept called gradient accumulation okay imagine you want to train a neural network to predict the price of a house given two variables the number of bedroom in the house and we will call this variable x1 and the number of bathrooms in the house and we will call this variable x2 we think because of some intuition that the relationship between the input and the output variable is linear so we can write that the predicted price is equal to x1 multiplied by the first weight plus x2 multiplied by the second weight plus a bias term our goal is to use stochastic gradient descent to find the values of the parameters w1 and w2 and bias such that the mean squared error loss between the actual house price and the predicted house price is minimized in other words we want to find w1 w2 and b such that we minimize this quantity here how do we do a training loop with pytorch without gradient accumulation so first of all we run the training for a few epochs we take our training data which is made up of x1 x2 and the target price we calculate the output of the model which is basically y pred is equal to x1 multiplied by w1 plus x2 multiplied by w2 plus the bias then we calculate the loss we do backward on the loss this will calculate the gradient of the loss function with respect to each parameter and then we update the parameters using the gradient we have calculated i am not using the optimizer i'm just writing the the update rule by hand so using a learning rate i don't use the momentum just for simplicity and this is actually how the training loop works right so this is this part here is equivalent to calling optimizer.snap and this part here is equivalent to calling optimizer.zero let's see it graphically what happens when we do a training loop like this so imagine we have our expression which represents the model which could in this case it's a very simple expression but imagine it's a very complex model okay what pytorch will do it will create a computation graph so it will take our input it will multiply it by the w parameters each input with its own weight then it will combine the sum of the two plus the bias term this will produce an output then we have a target the target is compared with the output to produce a loss and then we run back propagation to calculate the gradient of the loss function with respect to the target so let's visualize the training process one item at a time using our computation graph imagine we are training on the input x1 is equal to 6 x2 is equal to 2 and the target is 15 the first thing our model will do is will start from the two input nodes so x1 and x2 it will multiply by the w weights and we also think that the w weights have been initialized with the following value so the value of this weight is 0.773 this weight is 0.321 and this weight is 0.067 these values could be randomly generated as we usually do actually pytorch will produce the output of this node which is multiplying the x1 value with w1 then it will combine the two producing the output of the model it will compare it with the target to produce a loss which is a number but it's also a function so we can calculate the gradient so now usually we call a loss dot backward to calculate the gradient of the loss function with respect to each parameter so w1 w2 and b pytorch will also compute the intermediate nodes but i will not show them here for simplicity so we run loss dot backward what will loss dot backward do it will calculate the gradient of the loss function with respect to each weight how does it do it well the first thing we do it will do it will calculate the gradient of the loss function with respect to the output which can be done like this then it will calculate the gradient of the output with respect to this node i here i am showing only the computation of the gradient of the loss function with respect to the w1 node you can do the other ones for exercise for example so next it will compute the gradient of the loss function with respect to the z1 node but in order to do it because of the chain rule we need the gradient of the output with respect to the z1 node and then it will compute the output the gradient of the z1 node with respect to w1 and this allow us to calculate the gradient of the loss function with respect to w1 these are all the calculations that you need to do in order to gather the gradient of this node here and as you can see we also need to compute the gradient of the intermediate node but we are only interested in the in order to arrive to the gradient of the parameters of the loss function with respect to the parameters and these are the values for the gradient that i that we have calculated for each parameter the next thing we do in during training is we run optimizer dot step this will update the value of each parameter using the gradient that we have calculated and how do we do it we say that the new value of the parameter is equal to the old value of the parameter minus learning rate multiplied by the gradient why minus because the gradient indicates the direction in which the function grows the most but we want to move against this direction because we want to minimize the the loss so we put a minus sign here and this is how the value will be updated using the gradient that we have calculated in the previous step which was the loss dot backward function the next thing we do is we run optimizer dot zero so this will zero out all the gradients of each parameter and also the intermediate nodes and then we do the next iteration on the next item so imagine we are training one item at a time so batch size is one the next item may have x1 is equal to 5 x2 is equal to 2 and the target may be 12 this will produce this loss and this output the next thing we do is we run loss dot backward loss dot backward we calculate the gradient of the loss function with respect to each weight and you can see the gradient here the next thing we do is we run optimizer dot step which will update the value of the parameter using the gradient that we calculated in the previous step and the learning rate and finally we run optimizer dot zero and this will reset all the gradients for all the weights we may want to visualize this on this process on the loss function so let's see what happens to the loss function while we are doing this process we started some with some initial weights so remember we started with some randomly initialized weights values then we ran forward step on the first data item this calculated an output and then we run loss dot backward this resulted in a gradient being calculated for the loss function with respect to each weight this indicates a direction in which we should move our weights in order to minimize the loss because we move against the direction of the gradient so the arrow is pointing already in the negative direction of the gradient the next thing we do is we do optimizer dot step optimizer dot step will take our initial weights and will change the weights value according to the negative direction of the gradient we then run optimizer dot zero this just resets the value of the gradient and then we run forward on the next data item this will then we run loss dot backward and this will result in a calculation of a gradient which indicates a direction in which we need to move our weights in order to minimize the loss function and then we actually modify our weights using optimizer dot step so the actual update of the parameters values happens when we call optimizer dot step and finally we run optimizer dot zero and this will reset the gradient to zero and this is how gradient descent works without accumulation and without without gradient accumulation at every step so every data item because here we pretend we have a batch size equal to one we update the parameters of the model at every step and however with gradient accumulation we don't do at every step let's see how it works so the the initial part of the training loop with gradient accumulation is the same so we have run for a few epochs we extract the data from our training data so x1 x2 and target we calculated the loss just like before we run loss dot backward just like before the difference is here that we don't update the value of our parameter at every item we train our model upon or every batch we train our model upon but we do it at every few items or every few batches in this case i do it in this training loop we do it every two items because we are extracting one item at a time from our training data and so we update the the parameters using the gradient every two items in this case and what happens is that when the first item for example we will arrive to loss dot backward we will not run this code here we will restart the loop at the next item we will calculate the output we run again loss dot backward and this loss will produce this loss dot backward will create a gradient but this gradient will not replace the previous the gradient that we calculated in the previous step but it will be accumulated it will summed up to the previous gradient so let's visualize this process step by step imagine we have our first item and this is x1 is equal to 6 x2 is equal to 2 and the target is 15 we run the forward loop using this item this will result in an output being calculated and using the target we can calculate a loss we then run the loss dot backward this will result in a gradient being calculated for this item then we don't update the parameters we do forward step on the next item so note that during this forward step the gradient is not zero because we didn't zero it out in the previous step because in the previous step we didn't run optimizer dot step or optimizer dot zero so the gradient is still there from the previous item and okay the second item which is x1 is equal to 5 x2 is equal to 2 and the target is 12 will result in a loss being calculated and an output we then run loss dot backward and the pytorch will not replace this new gradient with the previous one we'll sum it up it will be accumulated that's why we call it gradient accumulation so the new gradient is accumulated with the old one now that we have reached the batch size we can now finally call the optimizer dot step method this will result in the values of the parameter being updated using the accumulative gradient and then we run optimizer dot zero which will reset the gradient to zero and then we can proceed with another loop of two items etc let's visualize what happens to our loss function so to our parameters and the loss function when we do gradient descent with gradient accumulation so our initial weights are here because they are randomly initialized we run the forward loop on the first item this will result in an output being calculated by the model then we run loss loss dot backward this will result in the gradient being calculated with respect to the first data item and this gradient will indicate a direction then we run again forward on the second data item and then we run loss dot backward in the second data item this also will result in a gradient being calculated but these two gradients will then be summed up by pytorch and this will result in a resulting vector that indicates a direction and then we run the optimizer so we do optimizer dot step which will update the values of our weights according to the direction indicated by the sum of the two gradients of the two previous data items and then we run optimizer dot zero this will result the gradients to zero for all the nodes and so with gradient accumulation we update the parameters of the model only after we accumulated the gradient of a batch and we can decide how much we want this batch to be so gradient accumulation is used not only distributed training it's also used for example when you want to accumulate the gradient without increasing the batch size because maybe a bigger batch size doesn't fit in your gpu so you can accumulate the gradient for more than one item and then move the parameters because this will result in a more smooth training the loss will oscillate less for example and now that we have seen how gradient accumulation works let's see distributed data parallel training in detail so how does it work what we mean by communication primitives and how do we manage the failover okay distributed data parallel training so imagine you have a training script that is running on a single computer but it's very slow because the data set is very big and you can't use a bigger batch size because it will result in an out of memory error on CUDA this distributed data parallel is the solution in this case it works in the following three scenarios so imagine you have a model that can fit on a single gpu and you have a training loop that works but it's very slow so the first thing you can do is you want to train the model on multiple servers each one having a single gpu and this can be done with distributed data parallel the second setup that you can use is you want to just increase the increase the number of gpus on your existing computer and this one also can be managed by distributed data parallel training the final setup that you can that you may want is you want multiple computers and each one having more than one gpu in this video i will show you how to implement this setup here because the other two setup are just a particular case of this one so this is the most generic setup we can have and i will show you how to create the cloud infrastructure for this setup and also how to run the to convert an existing code into a distributed training code and also run it on the cluster that we will create so from now on i will use the term node and gpu interchangeably if a cluster is made up of two computers and each computer has two gpus then we in total we will have four nodes or four gpus distributed data parallel works in the following way so at the beginning of the training the model's weights are initialized on one node so on one gpu and then send to all the other nodes using an operation called broadcast each node then trains the model the same model because it started from the same initial weights on a subset of the data so maybe this one is maybe one gpu is training it on the batch number one the second one is on the batch number two the third one the batch number three etc etc such that there is no overlap between this data and every few batches that these nodes get trained this model the gradients of each node are accumulated so summed up into one node and then sent the sum is sent back to all the other nodes this operation is known as all reduce then each node updates the parameters of its local model using the gradient received by the previous step so this the gradient receives are the previous step is the sum of the gradients of all nodes using also its own optimizer so doing optimizer dot step and then we start again from the step number two so we train it for a few batches we have some local gradient we send our local gradient to a central node which will sum it up sum it up and then send it back to all the nodes then all the nodes will update their parameters using this accumulated gradient and and then we continue again let's see all these steps one by one in detail so step number one our model's weight are initialized on one gpu so imagine we have a setup with four gpus we have one gpu that will initialize the weight and send it to all the others so now the value of the parameters this is the value of the parameter and this is the gradient so the value of the parameter imagine is 0.1 we only have one parameter so for simplicity the initial weights are sent to all the other nodes so now all the nodes have the same weights so all the nodes now have the same parameters the all the same value the next thing we do is each node runs a forward and backward step on one or more batch of data this will result in a local gradient being calculated because as we saw before when we run loss dot backward we we have a gradient being calculated of the loss function with respect to each parameter this local gradient of course may be different for each node because each one is training on a different subset of the data and this local gradient may also be the accumulation of one or more batch so it's imagine that this gpu is training on each gpu is training on three batch so we can accumulate the gradient for three batch and of course because we are training on a different subset of the data this cumulative gradient but still local is different for each node the next thing we do is we send all this gradient to every node sends its gradient to one single node and this node will calculate the sum of all the gradient it receives so imagine all the nodes decide to send their own gradient to the first gpu and the sum is calculated on the first gpu then this operation is known as reduce and later we will see how it works then the gpu that calculated the sum of all the gradients will send it back to all the other nodes in a in an operation that is known as broadcast and the sequence of reduce and broadcast because here i show it as a separate operation usually is implemented as a single operation known as all reduce and later we will see in detail how it works but this is the key idea so we have the models weights that are initialized on a model they are sent back to all the other models so now all the other gpus they they have the same weights initial weights they train it on a different subset of the data so each one has a local gradient they send each one its own local gradient to one node which will calculate the sum of all these gradients and send it back to all the other nodes so now they have all the same sum then they run optimization steps to update the weights using the same sum so they will produce the resulting weights of the models will be the same for all of them as you can see here so now each node will update the value of their own parameters using the same sum of the gradient you can see here so it's 0.3 they use 0.3 to update the value of their local parameters and they will end up with the same weights so each node updates the parameter of its local model using the gradient received after the updates the gradients are reset to 0 and then we can start with another loop now let's talk about collective communication primitives so the operation that we talk i showed before in distributed computing environments a node may need to communicate with other nodes if the communication pattern is similar to a client and the server then we talk about point-to-point communication because we have one client connects to one server in a request response chains of events however there are cases in which one node needs to communicate to multiple receivers at once for example in the broadcast scenario right we have one node that needs to send its weights to all the other nodes this is the typical case of data parallel training in deep learning so one node needs to send its initial weights to all the other nodes moreover all the other nodes need to send their gradient to one single node to receive the cumulative gradient back so collective communication allows to model the communication pattern between group of nodes let's visualize the difference between these two modes of communication imagine you need to send a file to seven friends with point-to-point communication you would send the file iteratively to each of your friend one by one suppose the internet speed that you have is one megabyte per second and the file is five megabyte in size what you do is first you send the imagine you are here so you have the file and you send it to your first friend and it will take five seconds because you are sending five megabyte with the speed of one megabyte per second then you send it to the second friend the third the fourth the fifth the sixth and the seventh in total the time to send the file to seven friends will be 35 seconds of course you may say okay but why not send the file simultaneously to all the seven friends at the same time of course you can do it but the problem is your internet speed is still one megabyte per second and the internet speed of sending the file simultaneously to seven friends will be split among these seven friends so each friend will be receiving the file at a speed of 143 kilobyte per second more or less so the total time is still 35 seconds to distribute your file to your seven friends let's see if there is a better way so with collective communication we introduce the first operator is known as broadcast so the operation of sending a data to all the other known although all the other nodes is known as the broadcast operator collective communication libraries like nccl which is pronounced nickel which is a library from nvidia assigns a unique id to each node and this node this unique id is known as rank suppose you want to send five megabyte with an internet speed of one megabyte per second and let's see how the collective communication would work in the case of this broadcast operation the first thing you do is you are here so you have the file you send it not to this friend here but to the rank number four at the next step we realize that the rank 0 and the rank 4 have the file so they can send simultaneously to another friend so rank 0 now will send it to rank 2 and rank 4 will send it to rank 6 but now we realize that rank 0 rank 2 rank 4 and rank 6 all have the file so they can simultaneously send to it another friend so in total it will take 15 seconds to distribute your initial file to all the seven friends compared to the 35 second with the point-to-point communication this approach is known as divide and conquer with collective communication we exploit the interconnectivity between nodes to avoid idle times and reduce the total communication time this is how also your gpu sends the initial weight to all the other nodes it's not one by one because that would be too slow not it's not even in parallel because anyway the connection speed is always the same it would be split among all the receivers what we do is we do this divide and conquer approach so our initial weights are sent using this broadcast operation in this manner here which is much faster let's see the reduce operation what is the reduce operation reduce operation means that we apply it during the training when we want to calculate the sum of the gradient of all the nodes so each node has a local gradient which was calculated using a subset of the data but they are all different from each other and what we want is to we want to calculate the sum of the all these gradients into one single node let's see how it works so the broadcast operator is used to send the initial weights to all the other nodes when we start the training loop at every few batches of data being processed by each node the gradients of all the node needs to be sent to one node and accumulated so summed up this operation is known as reduce let's see how it works so imagine initially each node has its own gradient because they are training on a subset of the data and these gradients is all different from each other what we can do is each node will send the gradient to his adjacent node so and the adjacent node will sum it up with the his own gradient so the node 7 for example will send his gradient to nodes number 6 and the node number 6 the receiver node will be responsible for calculating the sum and the same with the rank number 5 and 4 and 3 and 2 and 1 and 0 the next step we have the sum here at rank number 4 rank number 2 and rank number 0 what we do is we send the rank the sum here from rank number 6 to rank number 4 which will calculate the sum of the sum and then also from rank number 2 to rank number 0 the rank number 0 will calculate the sum of the sum and then we do a final step in which we send the sum that was present at rank number 4 to the rank number 0 and this sum here is the sum of all the gradients of all nodes and in total it took us only three steps to do it so with only three steps we accumulated the gradient of all nodes into one single node and it can be proven that the communication time is logarithmic with respect to the number of nodes and this is very typical of all the divide and conquer approaches the all reduce operation so what we saw before is that we are first broadcasting our data so our initial weights then we are reducing the local gradients and then we need to send it back the sequence of reduce and broadcast is known as all reduce and is usually implemented as a single operation which is faster than doing the sequence of the two operations i will not show the algorithm behind all reduce but you can think of it as logically as a sequence of reduce and broadcast operation but remember that in practice it's implemented as a single operation and it's much faster than doing the two operations alone now imagine you are training your model on multiple gpus and one node crashes so imagine you are training in a distributed scenario like the one shown below and suddenly one node is crashed and in this case two gpus out of four become unavailable how should the system react well one way would be to restart the entire cluster and that's easy however by restarting the cluster the training would restart also from zero because as you remember we start from initial weights that are randomly chosen by one node which are then sent to all the other nodes but this would mean that we would lose all the parameters and computation that we have done so far when this node crashed a better approach is to use checkpointing so checkpointing means that we save the weights of a model on a shared disk every few iteration for example every epoch and then we resume the training from the last checkpoint in case there is a crash so remember the step in which we initialize the weights of the model in one node and then send it to all the others well instead of just initializing it randomly we just can initialize the weights of the model using the latest checkpoint available so that the training can continue from there we need a shared storage for saving the checkpoints because it's pytorch that will decide which node will initialize the weights and so every node should have access to this shared storage plus it is good rule in distributed system to not have one node that is more important than the others because any node can fail at any time so we should not make any assumption on which is the node that will initialize the weights its pytorch will choose it and actually usually pytorch chooses the rank number zero but we should not make assumption on which node will be the rank number zero so all nodes should be treated equally so they should run the same code and they should have access to the same shared storage and who however when we have a shared storage who should be responsible for saving the checkpoint because if we make a code in which everyone is writing the checkpoint they may end up overwriting each other so what we do is because pytorch will give us will tell us which what is the rank of the current node we will write the code in such a way that we check the rank of the current node and if it's the rank number zero then we save the checkpoint if it's a rank number one two or three we don't do anything so it means that only one rank will be responsible for saving the checkpoint but later when we restart the training we don't make any assumption on who will become the rank number zero and as the pytorch documentation says it says that the the rank is not stable means that if you restart the training it the rank number zero may be assigned to another node okay now that we have seen how distributed training works at the theoretical level so we accumulate the gradient that is calculated locally by multiple nodes and then send it to one single node which then calculates the sum and send it back to all the others which then update the parameter using this sum of the gradients it's time to actually look at the practical training so we will first build the infrastructure that is needed to run our training and then i will also show you what are the code changes that we need to make to our existing training loop to make it distributed and run it on the infrastructure that we are going to create i will use paper space as a cloud service mostly because it's easy to use and doesn't require much setup time even for beginners i chose it over aws because aws has a lot of other setup that you need to do in order to even do simple operations and it's easy to get lost so i'm using paper space mostly for this reason so that anyone without with any kind of level of knowledge can do the same can follow the tutorial very easily so let's get started okay the first thing we need to do is to go to my repository called pytorch transformer distributed in which you will find the code of the distributed model that we will be running on this cluster and also the instruction on how to create this cluster on paper space so i have already accessed my account on paper space the first thing you will want to do is to create your ssh key just like you do on github so that you can use this your public ssh key to you need to associate your public ssh key to your account here so that you can connect to the machines that are created on paper space okay the first thing we need to do is to create a private network on which we will connect all these two machines so we will create two machines that are connected in this private network and also a shared disk that can be accessed by both machines we will use a machine that has two gpus so in total we will have four gpus on which we will run the training so let's create our private network networks here and we create a new network remember to choose the same region for your computers and the cluster and we will call it distributed training okay now we have our subnet you can see here the next step to do is to create two nodes of type of we can choose any node actually i i choose this one because i wanted to test two machines each one having two gpus and we use ml in a box as the operating system so as the image of these machines so we create a new machine ml in a box the machine we will do is multi gpu p4000 multiplied by two this one the region is the same as the network so new york 2 the disk size 50 gb is enough in total i think last time i created this cluster and i ran it for many epochs i spent five dollars so i think you should not spend more than five dollars for running your own distributed training it should not be more expensive than five dollars the first machine we will call it cuda zero the network we need to select the network that we have created before and we choose public ip dynamic because otherwise we cannot connect to the machine if without a public ip then we never create a snapshot because we don't care about backup for now and the price of running each machine should be around one dollar you can see here so we created the first machine and then we create also the second one so ml in a box the machine is this one new york disk size this one we will call it cuda one distributed training dynamic we don't save and create machine last but not least we need to create a network drive of 250 gigabytes we can create this is the smallest one they have available so that's why i chose 250 gigabytes we will call it model training 250 new york and distributed train this must belong to the same network as the two machines okay create okay so they are provisioning and starting the two machines now we will configure the machines so we need to install some packages first of all we need to install ifconfig because we need to have the ip address and while installing ifconfig i ran into a error with a seahorse and i show also how to solve this error we will then mount the network drive and then we will clone this repository install all the packages that we need for running this code and then we initial i also recommend using weights and biases for uh keeping tracking keeping track of the loss etc of all the metrics that you need during the training of this model so i recommend you register on weights and biases and then you install it and use it also for this for this code for running this code because it will make you make it easy for you to visualize the training metrics okay the cuda zero is ready we can see some information here and connect this will give you us the ip address we connect to it yes wonderful so now we are inside the machine the first thing we do is we update all the packages okay we do also install the net tools but i remember it will run into an into an error but looks like this time it doesn't which is good let's try ifconfig wonderful so now we have the ip address of the first machine which is this one this is the private address that belongs to your subnet that you created here so the one you created here 810 okay now we can do the we we need to keep track of this ip address because we later we need to modify the host and this is actually needed because i ran into an error with the pytorch when running distributed training because it could not um it could not reach the other node so i had to modify the host by mapping the host name of the other nodes into its ip uh okay i let's mount the network drive following just the instructions i have written so we install this package let me call this one cuda zero okay then we created the directory in which we want to mount this network drive and then we have to run this command here you can see it here but we need to replace the ip address and the username and password of the drive so let's first paste it then we need to replace this one with the ip address and the network share name which i'll show you how to find we go here drives and we can see here the address so we do but we need to replace the escape character with the slash slash okay and the network drive username is this one let's run this command the password is also here we can copy it et voila now it should be mounted the first thing we do is we clone our repository so we are in the home directory of the default user so paper space we can clone it directly here no problem we then cd and then we install the requirements okay now we have installed the requirements so now we can log in into weights and biases using this command here but remember to copy the key from the website of weights and biases so which can be found here let's run and it should be okay okay now we are ready to run the training command on the first computer but we need to also prepare the second one so let me prepare the second one of course in a real scenario you would create a docker file and you would run everything using kubernetes so it should be done automatically but in this case because most of you maybe are not familiar with kubernetes or docker or you just want to run very fast your training to see how it works so i recommend using paper space because it's very easy to configure all the setup okay just like before okay now we also clone here so we clone the same repository on both computers and then we run the same code for training but we will see later how to do it okay now we do login with weights and biases and now we are ready to run the training on both computers okay the command that you need to run to in order to run the training on both machine is the same but we first need to take the ip address of the computer that we will choose so one of the two computer will become the rendezvous master it means that all the communication will be managed by that node and all the others will adapt now of course to make it more fail safe we need to create we can use for example a dynamic ip that can be mapped to another machine in case the master crashes so that we can restart the training using always the same ip but in this simple case i will configure it by hand otherwise i need an orchestration tool and that will complicate all the scenario so in this case i just want to show you how to do distributed training i don't want to spend too much time creating the perfect infrastructure which you would ideally do in a real scenario so we take this command here and as you can see in this command we need to tell the ip address of the master node here so how which one we will choose the master in my case i will choose cuda0 so the first machine i have created and the other one will be kind of the slave even if they both perform the same operation so we find the ip of this slave here which is this one and we put it in the host file of the master and also i need the host name of the slave which is this one perfect so okay okay so we need to paste here the ip address of this node and also its host name which is this one and that's pretty much it now we can start the training so we take the ip address of the master now so cuda0 is our master which is this one and we put it in the command in this position here and we cd to the torch and we can run the command so in this command what we are saying is torch run is a special command that will create the cluster and will manage all the cluster creation and communication it will run our training loop you can see here first of all we need to tell how many process we have in this cluster so we have two computers and how many process we want to create for each node so how many compute how many gpus we have for each computer so this is the number of gpus per computer and this is the number of computers so we have two and two this is a unique id that indicates this particular cluster it should be unique for each cluster and this is the back-end library that is managing the communication for us all the parameters after the file name that we will use for training are the arguments that are passed to this file here so in our case we are running with a batch size of 8 we are also telling him that the model folder so where the checkpoint should be saved are this is the shared folder that we created before so the mount file of the shared network drive we run the same command on both computers and this will start the training so we do it this one and also on the other one as you can see this computer here is not proceeding it's waiting for the other so now we run also it here and now it should proceed yeah so now both are proceeding oops i forgot to set the host file on this computer here so i retrieved the ip of this one so ip ip of this one and also the host name of this one and we put in the host file of the other computer so okay let's run again the training so looks like it's proceeding so they are both doing yeah they are both building the data set now the tokenizer so if you have watched my previous video on how to code a transformer model from zero this is exactly the same code except that we i have added some things to manage the distributed training but it's very minimal code change and later i will show you step by step how to how i done so as you can see now the training is running in parallel the first thing you will notice is that the weights and biases is only initialized on one node because we cannot send the metrics from multiple nodes because it will interfere with each other so we send the metrics only from one node and it's the node with rank number zero we will see later how we check this information as you can see they are both training on a subset of the data so this one is training on 910 batch and this one also 910 batch it means that in total we have 1820 batches in total and each one is calculating a local gradient and sending it to the other who will calculate the sum of this gradient actually we have four nodes here because we have four gpu so each gpu is calculating a local gradient and each each gradient is sent to the rank number zero which will calculate the sum of all these gradients using the reduce operation actually the old reduce operation because then it will send back the sum to all the other nodes who will then update the parameters using the sum of these gradients that it has received another thing i made a mistake is that this 910 is not multiplied by 2 because it's not the the rank 2 is actually later we will see what is the difference between local rank and the global rank but we have four nodes each node is working on 910 batches of data so i only show one because tqdm will otherwise if i show the tqdm for both gpus it will interfere with each other this progress bar basically here so i only show one progress bar per computer not two because each computer has two gpus so actually i should have two progress bar but i only show one otherwise the visualization is very bad so first of all let's navigate the code to understand how it works let me open the project okay let's see here let's start from the train file okay the main difference that we have compared to the original code that i built in my previous video but it's the same this code with these changes that i'm showing here will apply to any training loop that you have built so it's not only for this one this particular code this will apply to anyone okay the first thing we do is we read the these two variables that are so when we run the code with the torch run torch run will insert some environment variables into our environment that we can read one is called rank and one is called local rank let's see the difference okay the local rank basically indicates the number of the gpu in the local computer while the global rank or also called just rank indicates the number unique id of the gpu among all the cluster so if we have four gpus the rank will be unique among all the cluster while the local rank is not unique but it's unique to the local computer the local rank is useful for example when we want to print for example only on one gpu per each computer while the global rank is useful when we want to only one gpu to perform an operation among all the others for example if we want to initialize weights and biases or any other service that should be initialized only from one node in all the cluster then we use the global rank which is this environment variable here while if we want to use something for example for printing or only one local gpu should use the tqdm or the progress bar or any other stuff that is can interfere with each other on the local computer then we use the local rank so the first thing i do is i load these two environment variables and save it into the configuration the second thing i do okay i print the configuration this first thing we need to do to initialize the cluster and this is where the torch run will stop waiting for all the nodes to connect is to call this function here init process group this init process group belongs to a package that i imported here called torch.distributed so these are the imports that we need to make in order to use distributed training so torch.utils.data distributed we need this distributed sampler this distributed data parallel this init process group and destroy process group so this is the first thing we do so we read the environment variables we save it somewhere so we can access the local and the global rank we call this function here indicating the backend that we want to use i am using cuda so i want to use nickel so which is nccl we can also use the local rank to tell cuda which is the gpu we will be doing training upon so each computer will have the will be given each gpu will be given its local rank with relative to the current computer so the first gpu will be assigned local rank zero and the second gpu will be assigned the local rank one on each computer so we set here then we run the training loop and after the training loop has finished we do destroy process group let's see the detail of this training group so when we do the training loop first of all here i disable the training on the cpu because because we are using a distributed data parallel so it only works with the backend the nickel it only works with cuda so i'm disabling on the cpu the second thing we do is when we create the data loader so here so the train data loader and the validation data data loader we need to disable the shuffling on the data loader and introduce this parameter sampler sampler and we need to pass an instance of the distributed sampler here in which we tell him what is the data set and we want to shuffle it so we shuffle it using distributed sampler not the data loader here and the next thing we do is we create the code the logic for pre-loading the checkpoint so we check if we want to preload the checkpoint in my case the default configuration says that the we should always load the latest checkpoint you can see it here so the configuration the default configuration says that we should load the pre-trained the the latest checkpoint available so the latest checkpoint file is retrieved using the path that we passed using the command so remember here we have a path that indicates what is the directory where we save the checkpoints and we use this one if there is a latest checkpoint this will be loaded in our model so our model is created here so we create an instance of our model which is just basically where you get the instance of your model and then you can preload some the state dict here and also the optimizer state dict and all the other global variables that should be pre-loaded for for resume the training if the global config rank is zero we also initialize the services like weights and bias you know in the case of weights and bias we also may want to resume the training from the same run in which we last crashed so every time we save the checkpoint we save also the ran the run id of the weights and bias run and we can restore it if we restore the checkpoint the big part that introduces the distributed parallel training is this so now we have our model which could be anything in the case of my code is the transformer model so it's a special class that i created in my previous video this one here it's just nn.model this one here we need to wrap it in an instance of distributed data model you can see here and we also indicate what is the device id we will be using so the gpu id which is the local rank we also okay with the global rank zero we can also initialize other stuff this in this case is just weights and bias the training loop is the same as the non-parallel code except that instead of running directly the model so if we before do model.forward we need to do model.module.forward so if we need to access the encode method of our model which is for example this method here we cannot access model.encode we need to access model.module.encode because this model refers to an instance of distributed data parallel if we want to retrieve the original model we need to do model.module and every time we run loss.backward on this module PyTorch will intercept this and will calculate the gradient the local gradient and after it has calculated the local gradient it will send it to all the other nodes for accumulation and then receive back the accumulated gradient and then this up this cumulative gradient is used when we use optimizer.step and then optimizer.0 will set it to reset it to zero when we want to save the checkpoint which for example we can do every epoch in my case i do it every epoch i save it only on the global rank number zero because i don't want to save the checkpoint on all the nodes otherwise they will be overwriting each other's checkpoint so i only do it on the global rank zero as you can see it here and this is pretty much what we need to do i let me show you a template that you can follow for your future projects on how to integrate the distributed data parallel in your existing code so let's see okay this is a template that you should follow for your future vid for future projects the first thing you do is you read these two environment variables called the local rank and rank the one the first one indicates the local rank so the number we saw before so the number of the gpu relative to the local computer not to the entire cluster the second one indicates the global rank which is a unique identifier for this particular gpu among all the gpus of the cluster we then call the function init process group we indicated the backend we want to use for in case of cuda which i think is most of the cases is nickel because it's the best one and it's made by nvidia so the second thing we do is we set which device cuda should use which is the local rank then we run the training loop the training loop only on the global rank number zero we initialize the services like weights and biases we create our data loader by telling him that as a sampler it should use the distributed sampler here and using shuffle but not shuffle here on the data loader we create an instance of our model which is our custom class indicating our model and if there is a latest checkpoint we can load it now after we have loaded the latest checkpoint we need to wrap our model into an instance of distributed data parallel by also indicating the device id it should use which is the local rank all the rest is the same except that on the global rank number zero we can collect some statistics so for example we can send some statistics to weights and biases and only on the global rank number zero we save the state of the model every epoch for example so that if the training crashes we can resume from the latest checkpoint let's try to simulate a crash so let's go here let's see how is the training going so as you can see now we are already training on the epoch number one so one epoch is already done and our code should be in such a way that as you can see the code i built here we are running validation only on the global rank number zero we actually you don't have to run validation during this distributed training you can do it asynchronously creating another for example node that reads the latest checkpoint and runs the validation asynchronously so that our gpu can work directly always on the training and not wasting time for validation because otherwise all the nodes are waiting for the node number zero to run validation and this can be expensive for bigger models so we can do it asynchronously okay now we can see that the node number zero the all the nodes are training the epoch number one as you can see here so i will try to simulate a crash and and see that the the distributed training will resume from the checkpoint of the epoch number zero that we have already completed so let's make it crash i will crash the master node directly so we can try the worst case scenario this one has crashed so i just killed the node and we see that this one should also be killed after a while okay this one is also killed we can restart using the same command as before as you can see they are loading the dataset loading the tokenizer and preloading the model as you can see here the model that was previously saved by the global rank number zero so now they should resume the training from the first epoch not from the zeroth epoch and yes they are starting from the epoch number zero one so because the epoch number zero zero has already been done and this is how failover works so you basically save a checkpoint every once in a while then you can restart the training from that checkpoint when you save a checkpoint you should also save all the variables that are relevant to resuming the training so if you have some state variables like for example a global step counter or you have some other counters that you need to keep track of you can save them in the checkpoint and then restore them when you load the checkpoint okay let's stop the training here you can try to experiment with yourself with the paper space i think it's quite easy and let me know if you have any problem i will try to help you okay now let's look at how distributed parallel training so distributed data parallel was integrated into pytorch so because there are some clever design choices into this to make it very fast let's review them so first of all when does pytorch synchronize the gradients well this happens when we call loss.backward because this when we call loss.backward this will lead to each node calculating its local gradient which is the derivative of the loss function with respect to each node in the computation graph and each node will send its local gradient to a central node which is the global rank number zero and receives back the cumulative gradient through an operation that is all reduce each node will then update its weights so the parameters of the model using the cumulative gradient and of course the learning rate of the local optimizer we can avoid pytorch synchronizing the gradient at every backward step and instead let it accumulate it for a few steps for example for a few batches using the no sync context let's see how to integrate it so usually you run lost the forward and forward step then you run the backward step this will lead to synchronization then you do optimizer.step and then optimizer.zerograd however if we want to do it every few epochs we don't want to run the synchronization at every step we can use the no sync context you can see here which is a method provided by distributed data parallel which is the wrapper of our model and basically we create this context manager this we run the forward step and the backward step and we don't call optimizer.step when we are outside of this context we still need to do the forward and the backward step then we can run optimizer.step and zerograd basically this no sync will disable the synchronization of the gradient but it will let it accumulate locally for a while and after a while we can we can synchronize also there is another very clever trick in pytorch which is the computation communication overlap so since each gpu needs to send its gradient to a central node for accumulation this can lead to an idle time in which the cpu gpus are not working because they're communicating right so each gpu will perform the forward step then it will perform the backward step and then there is some communication overhead because then gpus need to synchronize the gradients with each other calculate the cumulative on one node and receive back the cumulative one if we do this operation sequentially it will lead to a big delay in the gpu because this time they could do some other meaningful work for the training while so what pytorch does it will overlap the communication while running the backward step let's see how it works so as you remember we have a computation graph right so pytorch will communicate the gradient of a node as soon as it is available because as you remember we calculate the gradient of the loss function with respect to each weight but to calculate the gradient of the loss function with respect to each weight we need to calculate the gradient of the loss function with respect to the intermediate nodes so for example first we compute the gradient of the loss function with respect to the output then we compute it of the loss function with respect to the layer the weights of this layer here which are the weights and the bias but these are already available so we can already send them to the other nodes and get back the cumulative one so this can already be done as already this operation then pytorch will calculate the next layer and this one since it's already available we can already send it to the other nodes and receive back the cumulative one etc etc etc so while pytorch is computing the backward step we can already communicate to the other nodes the gradient of the that we have already computed and receive back the cumulative one this will result in a very fast speed up and to make the communication even faster instead of sending one gradient at a time pytorch basically will create buckets of gradients so every time a bucket is available it sends it to the other node and receives back the cumulative gradient for that bucket then after the second bucket is available it will send the second bucket and receive back the cumulative if we after the last bucket is available it will send it to the other nodes and receive back this way we can as you saw before we can overlap the communication overhead with the calculation of the backward step so while we are calculating the gradients we already send them so that the total time to process the forward the backward the communication and the updating it's less because one two steps are overlapped with each other pytorch recommends 25 megabyte as the size of the bucket because we don't want it to be too small because the overhead of the communication of each bucket would be too big so we have a lot of overhead for each bucket so we can spread this overhead on bigger buckets so less in number but bigger but we also don't want it to be too big because otherwise the we are we are not using the communication channel while we are computing the gradient so thank you guys for watching my video i hope you learned a lot in this video i introduced the data parallel training and i show you how to create the first the infrastructure and also how to run this code of distributed training on the infrastructure that we have created i also show you how pytorch works under the hood so that you can understand how the gradients is synchronized and also at a mathematical level how does it work please like and subscribe my video if you liked it and it was hopeful helpful for you i also recommend watching my other videos because i every time i make long videos in which i give a lot of knowledge and let me know if there is something you don't understand i will try to help all of you