Going Further with CUDA for Python Programmers
Chapters
0:0 Introduction to Optimized Matrix Multiplication12:4 Shared Memory Techniques for CUDA
20:12 Implementing Shared Memory Optimization in Python
42:15 Translating Python to CUDA and Performance Considerations
55:55 Numba: Bringing Python and CUDA Together
71:46 The Future of AI in Coding
Transcript
So, welcome. This is going further with CUDA for Python programmers. As the name suggests, this won't make too much sense unless you've got started with CUDA for Python programmers. The good news is that I have a video called Getting Started with CUDA for Python programmers. So, start there. It's only a bit over an hour long.
You might be surprised at how quick and easy it is to get started if you haven't. So, assuming that you have got started, today we're going to be looking at the most important next step of taking advantage of CUDA, which is we've already learnt to take advantage of the thousands of threads that you can run simultaneously on a GPU.
Today we're going to learn how to take advantage of the incredibly fast memory. So, up to now, although we haven't really talked about it, the memory we've been using is what's called global memory. It's basically think of this. So, this is the same book we looked at last week, which we do recommend programming massively parallel processes.
And the stuff we're covering today is largely covered in chapter 5 of that book. In this CUDA mode series, there's a lecture from Thomas Boonerman, which goes through this and the previous chapter in some detail. And so, that's actually a good video to watch maybe after this one or before this one.
Either order is fine. They're covering similar material in different ways. The key thing to understand is so, that we're looking at here today is that this, if we look at this box here, which is basically you can think of as a GPU. And in the GPU, you have global memory.
Global memory is basically what we've always been using so far when we just put, when we say like dot CUDA in PyTorch, it's actually putting the tensor into global memory. Global memory is pretty fast compared to some other types of memory we might be used to, but it's far from the quickest memory available on the GPU.
In fact, this shared memory is much faster. Shared memory, however, is not global, which is to say that not all of the threads can see it. In fact, as this box indicates, shared memory is something that's only available to the threads on a specific streaming multiprocessor, SM, or in CUDA programming world within a block.
So, all of the different threads in a block can access shared memory. And the reason we care about this is that shared memory is about 10 times faster than global memory. And because CUDA with all of its simultaneous thousands of threads running at the same time is so incredibly quick, because GPUs are so incredibly quick, the speed at which you access memory turns out to matter a whole lot.
So, being able to use this shared memory effectively is as important as being able to use the thousands of threads at the same time simultaneously is important. So, in the last lecture we focused on how to use all of those threads, and today we'll focus on how to use shared memory.
Those two things will get you quite a long way in terms of creating pretty fast CUDA code. Okay. So, the repo for these lectures is the CUDA mode repo, and specifically the CUDA mode /lectures repo. And in there you'll find there's a lecture 5. You don't have to have seen all the lectures beforehand, but they're certainly all useful.
Just need to have seen lecture 3, which is the one I mentioned. Lecture 5 is where today's notebook will be found. And here it is. Okay. So, one thing I'll just mention that I've added is a little utils.py where some of the stuff that we used last time, and what we used quite a bit, I've just put it all into a script so we can access it multiple times.
So, we've got the C div, which is sealing the vision function, the little load inline wrapper called load CUDA, and the little kind of prefix we have that has the hash includes and the stuff we're going to need there. And so, you'll see that we're going to import those here.
Other than that, we're going to import all the usual stuff that we like to use. Last time we used simple namespace, but actually thought let's make things closer to -- let's make things closer to how CUDA does things, and let's create a little thing called dim3. So, this is a 3D grid with an X, a Y, and a Z using the handy little Python named tuple functionality.
So, here's a nice way for us. And we can, just like in CUDA, provide as many of the dimensions as we want. Today we'll be doing two-dimensional grids. So, there'll be implicit Z equals 1. So, we can access these as D dot X and D dot Y, for example.
Like before, we'll use Wurlitzer to print stuff from CUDA if we want to. CUDA launch blocking is helpful for debugging, so you can turn that on if you want to. And so, today we're going to do a matrix multiplication of a 5120 by 256 matrix M1 by a 256 by 5120 matrix M2.
This approach of going from -- it's not true. Okay. So, like before, we're going to start by looking at pure Python, and so pure Python is going to be really, really slow. So, to handle that, we're going to create a sample of the first matrix with the first four rows, and a sample of the second matrix with the first four columns.
And so, we'll use that for our pure Python example. All right. So, just to remind you what we've already done in the past is we created this simple kernel runner that goes through every block and every thread. Not real blocks and threads, they're actually just integers. And calls some kernel, which is not actually a kernel, it's just a function.
And I'm going to use dem3 now that we've got it to pass into that. And so, this was our previous matrix multiplication. We grabbed the row, we grabbed the column from the indexes we passed in. We have a guard. And we then accumulated our dot product for whatever particular row and column we're filling in.
So, this is basically the -- ignore the extra details here, but conceptually, we're just doing this dot product, for example, to fill in -- this is -- so, if we're filling in this here, then this is R. And this is C. So, this is R comma C. And so, we're doing the dot product between that column and that row.
And so, that's what this looping is here. So, I is going through all of the elements of the row and the column. And multiplying, adding, and then putting that into the output. So, that's what we do. We have a so-called kernel. And then we created something that would call the kernel by calling our kernel runner, passing in the function.
We need our blocks and our threads per block, which are just dem3 tuples. And then we pass in our flattened data and our -- any other information that's required. And so, we can check that that matrix multiplication result using these small sample versions is close to the PyTorch version.
And it is. And then we also looked at the CUDA version. And the CUDA version we created by pasting the kernel into chat GPT. And it's bad out something which we hardly had to change at all to get this. And the kernel runner also looks very similar except that the syntax for calling a kernel in CUDA is different with this weird triple angle bracket.
To make life a little bit simpler for myself, you might remember before we had the CPP source where we would copy and paste that into a string. I got a bit bored of doing that manually. So, I created a little get signature function that just uses a regular expression to automatically find that line of code.
And so, for the rest of this lesson, I will be getting this CPP source automatically. That way I don't have to worry about changing it. But you can see that regex is just returning the necessary line of code plus the semicolon. So, that makes life a little bit simpler.
And I like being simple. Okay. So, then we go load CUDA. It ran very quickly because I've already compiled this once and PyTorch caches that. And this is actually another change I made since last time is that in the load CUDA function, if you don't pass in a name, then it uses the function's name.
And that means that PyTorch will cache different versions of your code with different names for the various different things you're doing. So, you won't lose your cache each time. So, that's handy as well. Okay. So, now we can use the full matrices because we're going to be nice and fast.
We need them to be contiguous in CUDA. So, we will create M1C and M2C for that. And they should be similar to the result of PyTorch doing it. And it takes about six milliseconds. One thing I wondered about is how long of that six milliseconds was it actually running the matrix multiplication compared to doing all this other stuff before it.
So, I just commented out those two lines of code and reran it. And that took about 50 microseconds. So, that's 0.05 milliseconds. So, very little of this time is kind of overhead. Most of this is actually doing a matrix multiplication. So, I think that's an encouraging start. Okay. So, how do we take advantage of shared memory?
The problem here is that in a loop here, M and N are global memory. And so, in this loop that's happening K times, we are reading from global memory again and again and again. And that is a bit of a bummer. So, there's a better thing we could do, which is instead we could use shared memory.
Now, the problem is that shared memory is quite small. So, we can't just dump everything into shared memory for every single thread. Because we've got lots and lots of threads running at the same time. Or I should say for every block. So, we've got lots of blocks running at the same time.
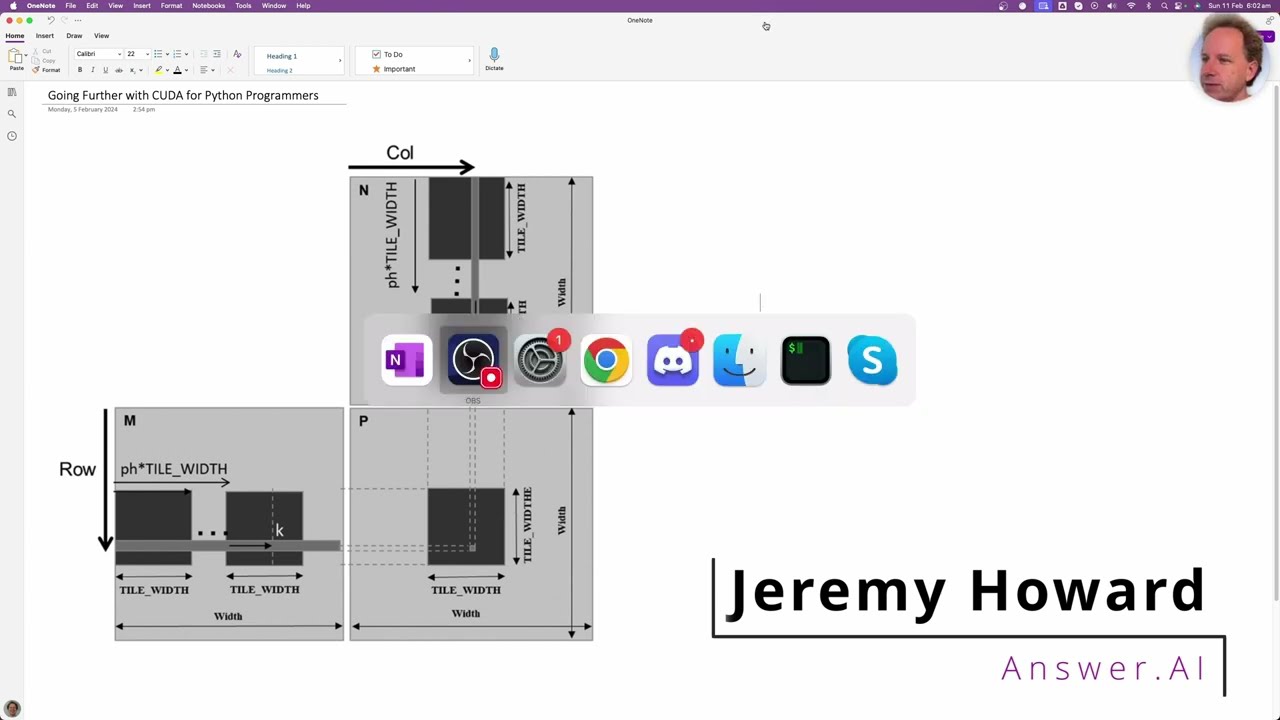
If every one of them had the entire matrices in memory for every block, that's going to be an enormous amount of data. And that's going to be far too much for our GPU to handle. So, to deal with that, what we do is we do something called tiling. And a tile is basically -- so, we're going to pick a tile width of 16.
So, here it says tile width here. We're going to use 16. We basically say, okay, if we're going to calculate this R comma C thing here, right, instead of doing the entire dot product of all of this row and all of this column, what we could instead do is just grab the first little bit of that row.
And the first little bit of that column. We could take the dot product of those and put them into R comma C. And then we could do that again for the next tile across and the next tile across and so forth. And this is what this dot, dot, dot here is.
And the next tile across. And so, then, you know, eventually we get to this bit of the row by this bit of the column, take the dot product of those and add them up to the existing R comma C output we've already got. And so, that's just -- it's doing exactly the same thing.
But rather than doing the dot product all at once, we're doing it one step at a time. That's not interesting of itself. But what is interesting is you might notice that let's say for calculating this bit here, let's say, so this is thread zero comma zero, we can do the same thing.
We can take the first little bit of this and the first little bit of this and take their dot product. And that gives us the first piece we're going to need of that one. And we can do that again and again and again until eventually we get to this one.
And we do this bit times this bit. And we keep going all the way to the end until there's a final tile at the end. And once we've done that for all of the bits, eventually we're going to have the correct answer in zero comma zero. Why is that interesting?
Well, it's interesting because we could reorder this rather than doing the whole first little bit of this row and then the next bit of that row and the next bit of that row and the next bit of that row. Instead, what we could do is we could calculate zero comma zero for the first tile and then we could calculate zero comma one for the first tile.
And notice this is zero comma one. It's exactly the same row as we had before, right? But a different column. Now, with a normal kind of CPU style thinking, you'd say like, oh, maybe this will be in the cache. So this could be faster. And that doesn't work in GPU programming and GPU programming, we instead use shared memory.
So we could have put this into shared memory. And if we had done so, then the second time we use it, we don't have to read it from global memory. It's already there in shared memory. And then the same thing will happen when we get to the second row, right?
We could put that into shared memory. And then we go second row of that tile times the first column of that tile is needed to do one comma zero. And if you think about it, we've already accessed the first column of the tile in N. So if we had put that in shared memory as well, then we won't have to get that from global memory either.
So maybe you see where this is going. What we're going to be able to do actually is before we do any work is we'll put this whole tile into shared memory and we'll put this whole tile into shared memory. And then we'll take the matrix multiplication of the two tiles.
And that will give us all of the first pieces of the entire tile output. And then we'll do the same for the tile one to the right of this one, and one underneath this one. And we'll take the matrix product of those and add it to this again, and so forth until eventually again, we get up to here, we put that whole tile into shared memory, we put that whole tile into shared memory, we take the matrix product, which again, remember it's just lots and lots of dot products, the column and row dot products.
And so all of those are going to be able to use shared memory and we can we add them to the outputs here. And so once we eventually do that for all of the tiles, we will have finished calculating these outputs. So how many times did we read from global memory?
Each of the input elements only got read from global memory once. And the soon as we grabbed it, all we did with it was we put it into shared memory, and then the actual dot product was entirely done from shared memory. And that's how we make this faster. So to do that, let's use Python, plain Python.
And we're going to basically try to design something in Python that looks a lot like how CUDA is going to do it. And then we're going to auto generate CUDA just like we have in the past. So in CUDA, the kind of maximally flexible way to do things is what's called dynamic shared memory, where you tell CUDA how much shared memory you're going to want.
And it puts it aside for you. And then in basically one contiguous block with a pointer to that block that you will have access to, which is the same as an array. And then you basically grab from that block any of the pieces you want. In Python, we can do exactly the same kind of thing by using a trick which is true for both NumPy arrays and PyTorch tensors, which is that views into those tensors are writable.
So if we create a tensor of length 5, and then we create a view of the first three elements and of the last two elements called B and C, if we then modify B, it actually changes A because they're a view of the same memory. And if we change C, it'll also change A.
And so that's going to be handy for us. You'll see why in a moment. We're going to basically use our shared memory like that. Now, the thing is, we've got to restructure our kernel runner a little bit because we have two steps now. Step number one is copy all of our input into shared memory.
And then step two is take the dot product. And so that doesn't quite work with our previous approach because we just have one big loop and we just have one thing that we do. So I've changed our kernel runner to create a shared memory kernel runner. I've still got the same loop through blocks dot Y, the same loop through blocks dot X.
This is all pure Python again. And here I'm going to create our shared memory. And so this is now going to be passed the shared memory into each function. So all of our threads are going to have access to the same shared memory. Now, we don't actually create the threads here.
So instead, step number one is in my kernel, I'm actually going to do the loop through the threads manually. We'll improve this in a moment. Don't worry. It's pretty messy with all this kind of duplicate code. But at least it's nice and simple to understand. So first of all, let's just run this and confirm we get the same answer as before.
And we do. So let's see what's happening. The bit that does the running is exactly the same, except that I'm calling our new shared memory runner. And I'm also telling it the third thing you have to pass in is the shared size is how much shared memory. So how much shared memory do we need?
We need tile width times tile width. Because that's the size of the tile is tile width by tile width. But we're going to need two of them, one for m and one for n. So the amount of shared memory we need is tile width times tile width times two.
So that's what this is. Tile width times tile width times two. So that's going to be passed in as the shared memory size. And that will be constructed here. Okay. So that shared then gets passed into our kernel. Our pretend kernel. And it's just one big continuous block of memory.
So we have to grab the first share size bits and that will be our m shared memory. So our two inputs are m and n. And everything from there onwards is going to be our n shared memory. So then what we do is we loop through. This is exactly the same as we had before.
In fact, I should use C div here to make it a bit more obvious what's going on. C div. So we go through every element in the dot product we're going to need. And so the indexing starts to get a bit complicated here. So pH is what the book and therefore we will use, which is basically the index of what tile are we up to.
So we loop through each tile. So look through each tile. So the number of tiles we'll need is the size of the k dimension. So that's the number of columns in m or the number of rows in n. And then divide that by the tile width. And that tells you how many tiles will fit.
We do a ceiling division to go all the way to the end. So then we need to know. So let's say we're doing again we're doing this R comma C one here. So we need to know where this is. Where does it start? And the answer is that we've done pH lots of tiles so far.
Each one has jumped across TW or tile width. So this distance here is pH times tile width. And we're going to call that IDX. So this is an important tip. I found I had a lot of trouble getting this to like settled in my head until I drew it all out and wrote on my picture what everything is.
So and I've been doing this with the help also of my friend Karim who works with me at answer.ai. And he found the same thing. We were both like our first attempts were both to do it just in code and we did not get it working until we actually started drawing it out.
And that's when Karim and I actually were like oh OK that all makes sense. So that's what IDX is. And so notice IDX is that but it's also because this is these are symmetric it's also that. Like it's also IDX. OK. So now we need to fill in the shared memory.
So we've got two sets of threads one to fill in the shared memory and one to do the matrix product. Let's write that in fill shared to the dot products from shared. OK. So we need to go through all of our threads find out what row and column we're in.
So how do we find out what row and column we're in. And again these are the things that get complicated. So this is our as we've already mentioned. So R is going to be equal to look there's two pieces of it. There's the IDX piece goes from here to here.
And then there's also an additional piece which is from here to here. What is that piece. Well that piece is simply the coordinates of this grid location within the tile. And so remember that we are looping through. So blocked in dot Y and blocked into X is the size of the tile.
Right. So that means that. All right. So we've got tile row and tile column. And so that's what that is. So that's so therefore this here is tile row and this here is tile column. And so therefore to find R we have to add together IDX plus TR. And here it is IDX plus TR.
And that needs to be less than the second dimension of the matrix. And then here we just need to index into it. So if this was a two dimensional tensor we could just do TR comma TC but it's not it's one dimensional so we have to flatten out our dimensions so it becomes TR times TW plus TC.
So this is filling in our M shared and N shared by going through all the possible elements of the tile and filling them all in. Okay. So after this bunch of loops is complete MS and NS will simply contain a copy of the appropriate tile from M and N.
And again here the indexing we're doing is so this remember is the kind of element that we're up to in terms of the column. And this is the row that we're doing but we have to do times C times K in order to deal with the fact that we've flattened out our indexes.
If one thing to think about that you might have been wondering is what about this this final tile that goes off the edge. So it's not big enough. So what happens there. So for that final tile we put in zeros. So we call that padding. And so they show that in the book here.
So in this case they're doing a four by four matrix multiplication containing two by two grids. And you can see here when we're doing this one we've actually sorry it's a three by three using a two by two grid. So we get to this piece here it goes off the edge.
So what happens when we go off the edge we just put zeros in to the shared memory. And so that means then when we do the dot product between this one here containing zeros and this one here containing zeros then the zeros can just be ignored. They don't they don't do anything because they're just zeros.
So that's why we put zeros in if we are outside the dimensions of the matrix for both m and n. So now that has filled in our shared memory or our pretend shared memory. I mean it is shared memory it's just not any faster because we're just in Python.
And so now we've done that we can go through all the threads again and find out what row and column we're in using exactly the same code. And then we can go through our tile width and aggregate all of the bits of our dot product. So why are we aggregating through tile width because the dot product will always be between tile width on this side and tile width on this side.
So every one every row from here and every column from here will be of size TW. So that's why we do that. Okay so okay so that's that rather messy tiled matrix modification in Python. So then I but like this is the place to start. So if you don't understand anything come back to here because you can run it through in the debugger.
You can print out what the shared memory looks like. You know you can make sure you understand exactly what's going on because it's plain Python. And so then all I've I did is I basically said okay well effectively that is saying oh run this bit of code as all the threads and then run this bit of code as all the threads.
So just to refactor this a little bit I created a run threads function that just says okay look through all the threads and call some function. And so using this approach so with this function available we can now change our loop so that instead of having to do this big for loop we can just say run this function in every thread and run this function in every thread.
And so then those functions just contain the two pieces. So this is now going to get a bit closer to what the CUDA code is going to look like. The CUDA code is going to have something that says go through each tile and then fill the shared using all the threads and then do the dot product using all the threads.
Okay so this is identical to the last one we've just refactored out the loops. So it's going to get a little bit closer to what the final CUDA code will look like. The thing that calls it is identical and of course therefore the result's the same. Are there any questions so far?
I think he asked about the relationship between blocks in CUDA and the tile size. Sure yeah so in CUDA a block is a as we learned in the last one of these lectures a block is and is just a kind of a conceptual thing that the CUDA programming model provides.
It's just a bunch of numbers basically that are passed to your function as block IDX. And you know that all of the threads in a block will be running on the same SM on the same streaming multiprocessor. What you do with that information is entirely up to you and last time we did nothing with that information.
This time we're going to we're taking advantage of it to say like okay well everything in a block has access to the same shared memory. So we decided that we will treat a block as something that is calculating one particular part of our output a tile. So that's what we called it we just called it a tile.
So a tile is just a is a semantic thing that we're using. And by mapping that semantic idea of a tile to the CUDA programming models idea of a block and basically saying okay we're going to treat each block as a tile. It's going to allow us to use one block to calculate one tile in our output.
And so therefore we're going to have one sort of shared memory for each block which we're mapping to each tile in our output. So you can kind of think of them as being the same thing. But they're kind of conceptually different. Okay so now we're going to make it even more CUDA like because actually CUDA code does not have a thing called run threads.
It doesn't look like this. Instead in CUDA code there is no loop like this. But instead all of these functions across all of these possible I0 and I1 coordinates are run at the same time. I mean not necessarily the same time but they can be the same. They can all be the same time or some subset of the same time.
Conceptually for the programming model you think of them as all running at the same time. To do that in Python we have to use threads. Now in real life Python threads don't actually all run at the same time except in certain situations at least with the current version of Python because there's a thing called the global interpreter lock.
They actually run one after the other. But again for the programming model we can ignore that. So we're just going to pretend that they actually are in parallel. So to create threads we use Python's threading library. It has a thread class. And so let me show you a couple of interesting things here.
I've got a function here called g that just prints whatever you pass it and it prints the negative of whatever you pass it and it prints whatever you pass it times 10. I'm going to call g using a bunch of threads. One convenient way to create and run a bunch of threads is with a thread pool executor.
This is going to create three threads and run them at the same time or as much as that this Python can handle. And so that thread pool dot map basically will run all the numbers from one up to num and call our function g. So it'll call this three times.
So if I just comment out these mysterious lines of code you can see what it does is it runs all of them for the first thread and then all of them for the second thread and then all of them for the third thread. This is not going to work for us because we want all of our threads to first complete the task of fill in shared memory and then all of them to complete the task of doing the dot product.
So we need to have a way to tell a thread to stop until all of the threads are up to this point and in Python that thing is called a barrier. And so we can create a barrier like so and we can say create a barrier so that until three threads have hit that barrier stop.
So that's what and so then we're going to pass that in this sink barrier SBSinkBarrier. And so it's going to pause at the sink barrier until all the threads are here and then pause at this sink barrier until all the threads are here. And now if you run it you can see they all complete the first task and then they all complete the second task and then they all complete the third task.
And you'll see they don't necessarily do it in the same order because threads can you know happen in any order. And so this is the trick which is going to allow us to have a single loop which everything in that loop first does the shared memory filling in task and then does the dot product task.
So here is our new kernel runner as before it goes through each block as before it creates our shared memory and it's now going to create a synchronization barrier containing the number of threads. So threads per block Y times threads per block X is how many threads there will be.
And then we're going to create a whole bunch of threads one for every Y and one for every X. If you haven't seen this before in Python if you have two things in a list comprehension it just does the Cartesian product of those. So go through every anything in Y and everything in X and so O and P will be our two coordinates.
So create a new thread the function that it's going to call is whatever function you asked for and the arguments are going to be the coordinates of the block the coordinates of the thread. And then we'll say how many threads per block pass in the shared memory pass in the synchronization barrier and any arguments you requested.
And so now this looks like actually as you'll see like CUDA code we can figure out what our row and column is using exactly the approach we saw before although now our row and column are actually going to be based on block IDX and block DIM because this is actually telling us whereabouts we are.
The shared memory is exactly the same as before and so again we loop through all of our tiles and again we set the shared memory just like before. But you'll notice now we don't need two separate loops we just do the set the shared memory piece and then we say wait for the synchronization barrier.
So remember that this is happening for every this is happening for every output value in the tile simultaneously. At least as far as the programming model is concerned it's simultaneously in fact in Python it doesn't do a good job of actually paralyzing it and in CUDA we don't know for sure if they're happening exactly the same time but as far as the programming model is concerned we should think of them as happening at the same time.
So all of these different coordinates are running conceptually at the same time. And so when we hit wait here that means that all of the threads have finished running those two lines of code. And so now we know that MS and NS are filled in for that tile. And so now we can go ahead and do the dot product.
And then once every thread has done its own dot product we then need to stop and wait until they're all done. And then once they are all done we can go ahead and fill in the next tile shared memory. This is very important to have this wait here because if this wait wasn't here then some of them will still be going ahead and doing the dot product and others will be replacing the shared memory and that was going to give you wrong answers.
So you have to wait after you've completed the shared memory filling in and you have to wait after you've completed doing the dot product. Okay this code's identical to before. And again it's giving us the same answer so that is a good sign. So here's the cool thing. I then took this code and I passed it into chatgpt and I said convert the following Python code to CUDA C and I pointed out that you can remove these from the argument list.
So we don't need those in the argument list. I mean obviously you can manually remove this but I just thought if I have one prompt that always works I don't have to do anything manually. I said change sync_b.wait to sync_threads and I said for creating shared. So we'll talk about all this in a moment.
So basically told it about the minor things it would have to change to convert the Python into CUDA C. And the thing it gave me worked first time. Although I did do some minor cleanups. But this is the code it created after my minor cleanups. So you'll see now it's getting, so it's converted the, it recognises that we need float arrays for our input and output matrices.
It's typed all of those things correctly. And so in my cleanup I added a few things. So I've got now the tile column is thread_idx.x, the tile row, thread_idx.y, and then we've got r and c just like before. Now CUDA the way it does shared memory is a little bit weird.
It doesn't get passed in just like thread_idx and block_idx don't get passed in. You just have to put this magic incantation in exactly one line of code in your, in your kernel. And so here it is. Here's this one line of code. And then following that you say what data type you want your shared memory to be.
And then you say what you want to call it and that's an array. So this is created something called ms, which is the pointer to the start of the shared memory that CUDA is going to create. So that's what externed under shared means. So ms is a pointer to the start of the shared memory.
We need ns to be a pointer to the start of the second half of the shared memory. So go in tile_width times tile_width because that will finish off the m part of the shared memory. That's tile width by tile width. And the second half is the n part, just tile width by tile width.
So remember we did this in the Python version as well. So if any of this is confusing, go back to the Python version and step through it in a debugger. So now we've got ms and ns as our shared memory. And then this is exactly the same as the Python version.
But we've now got this sync_threads. So sync_threads is identical to the sync_b.wait. It says wait until all of the threads are finished doing the previous lines of code before any of them are allowed to do the next one. Because this stuff's built into CUDA, we don't have to create a sync_barrier object and pass it in and all that.
You just have this magic line of code. So there's quite a bit of magic in CUDA, like this externed_shared and this_sink_threads. But there's not too many pieces. And you can see we're basically using them all here. So the next part is then to call the kernel. And so when we call the kernel, we've got the normal triple angle brackets, blocks, threads per block, and then we pass in one third argument to the triple angle brackets, which is how much shared memory do you want to create.
And so that is what's going to be used automatically when it creates this shared memory that we get a pointer to here. That's how much shared memory it will create. How much shared memory should you create? Well, in this case, I've commented out this section, so ignore that for a moment.
For now, we're just going to do the same thing. We're just going to make the tile_width 16. So the amount of shared memory we need in bytes is tile_width times tile_width for m times 2 for n as well, times size of float, because we don't want bytes, we want floats.
So that's the amount of bytes of shared memory we need. And that's what we pass in. Okay. So that's basically that. And so we can then run that. And we can see that we get the same result, which is good. One thing, though, which is a bit of a worry, is that our time is actually slightly worse.
It's gone from 6 milliseconds to 6.5 milliseconds. So we'll talk about that in a moment. I just want to mention one other thing that is in the book, they say, okay, for your size, you should write some function to calculate what size it should be. But they never say how to do that.
And so in future lectures, we'll be talking about how to think about things like this and how to design this correctly. But in this commented out section here, you can see the basic idea. So this will work if you run it, even though it's not necessarily optimized. So you can call this special function CUDA, get device properties, passing in a structure to fill in.
So and means a pointer to that. That's like a reference to the structure to fill in. And I think this is the device number, if I remember correctly. And it will return back a structure containing a number of things, including max threads per block. So and it will also give you shared memory per block.
So you can use that to dynamically figure out threads per block and to dynamically figure out your tile width and stuff like that. I'm not saying this is an optimized way to do any of those things. It's just an indicative kind of showing you how you can get all the pieces you can need to calculate that.
And so in later lectures, we will learn more about how to actually figure out what would be the optimal tile width and shared memory size and so forth. But for now, I'm just using 16. Okay, so this is the mystery part. The mystery part is this is slower, as we saw.
But if I take the exact same code, instead I use this thing where we tell it what size to create is called dynamic shared memory allocation. If we don't use dynamic shared memory allocation, then we do that by not passing in the shared memory size here. But instead, if we know at compile time how big we want our tiles to be, so we can try I've tried both 32 or 16, you can actually create an MS of TW by TW and an NS of TW by TW.
So you can have two separate things and because we know we're deciding at compile time what our tile width is, then this is not dynamically created. The rest of the code is the same, except now we've got proper kind of two-dimensional indexing, which is nice. And with this one, this is faster.
So we've gone down from 6 to 5. And I think if I remember correctly, when I tried 16 tile width, it's a bit faster too, it's more like 4. We'll have that running in the background. 16. Okay, let's recompile that. Okay, any more questions before I move on? So we have to the shared memory, we need to be able to store the tile for M and the tile for N.
So each one of those is TW by TW. And so therefore we need two times TW by TW in order to have enough room for both of those two input tiles. And then we use it here. We've got a pointer to the start of M, we've got a pointer to the start of N.
We also saw it in the Python version, the shared memory size we passed in. TW times TW times 2, because we needed the MS, M's shared memory tile and N's shared memory tile. Okay, thank you for the question. Do you find some documentation or some reference why the dynamic shared memory version is supposed to be this way?
I'm a little bit surprised that it's... No, it's a total mystery to me. So maybe there's something wrong with my code. I don't know. So this is something I think we should try to follow up on and maybe some of our friends at Nvidia can tell me the dumb thing I did because, you know, I'm a newbie to all this stuff, so I probably did something stupid.
But yeah, I've looked around, I've read around, I've searched, I've asked chat GPT, nothing so far has told me. I've found some other people who have said the same thing on the internet saying like, "Oh, why is my dynamic and static having different speeds?" I haven't found answers to any of those either.
So yeah, this one's a... The theory is that it definitely should not be solid. They should be identical. They should create exactly the same PTX code. So yeah, my guess is maybe I've made a mistake in my code somewhere. So I will... If anybody figures this out, I will update the YouTube description to say what the answer turned out to be.
Oh, hi there. Jeremy here with a message from the future. I figured out why that code was going slowly. And the reason is because of this tiny little bit here. The problem is that when TW, the tile width, is not known at compile time, it turns out that CUDA does not know how to create an optimized piece of code for a range of tile widths.
So it falls back to the slowest possible version. I found a somewhat better solution than just supporting one constant tile width which is... You can skip over this if you're not interested. It's a bit more advanced, but basically you can use a C++ template and you can make tile width a template parameter instead of a normal parameter.
When you do this, now you can only call it with a constant tile width, which is a bit ugly, but you can actually deal with that by basically supporting some fixed number of tile widths and it will compile a separate version of the kernel for each one. So I've got it here doing eight and a 16 and a 32.
So you could have something... So here I've just got tile width equals 16, but it's a variable to kind of show it's possible and you could replace that with some code that calculates dynamically whether you want to make it eight or 16 or 32, or you could do additional ones as well.
And then there's a lambda. This is how C++ very ugly does lambdas. Looks quite different to Python lambdas as you can see, but basically this is a lambda now which we'll take. So this is the function that we're going to call and we'll call that function using some particular kernel.
This is the kernel function, kf is the kernel function. Anyway, so lots of messiness there. It's pretty hideous code. And I guess this is where it gets pretty complicated when you actually want to have optimized kernels for a range of different hardware. The good news is that at the moment at least any even reasonably modern Nvidia GPU supports exactly the same amount of shared memory.
So maybe all this dynamic stuff isn't that necessary. Although having said that I do think that you do need to change the tile width depending on the matrix size or the size of the matrices that you're using. So yeah, I do think this is actually reasonably complicated to make it work well in lots of different situations.
And I guess this is why there's a whole team of people at Nvidia who work on doing this in Kublai and Gudian and so we don't have to worry about it. Anyway, I'm glad I got it figured out and I will now return you back to our scheduled programming.
All right. So now I've got something really exciting to show which is that we can do everything that we've just seen in a different library called number. Number is another way of writing CUDA code. It's a way of writing CUDA code where you actually write the CUDA code in Python.
Here is the CUDA code for our call. I haven't tried this before but we can actually see how long this takes to run. Okay. That's interesting. So this one is slower still. So again, maybe I'm doing something weird. This is using the dynamic shared memory approach. I've got two times tile width, times tile width, times -- I just manually put four which is how many bytes an hour in a float.
But still it's running at CUDA speeds which is good even if it's not the full speed we were getting from CUDA. Now why would you do this? Because actually if you look at the amount of code I have here, it's not less code than the amount that I had here.
So it's not like -- it's not easier to write. I mean, so I've still got to use block IDX, block damn thread IDX. So all these are now available in the CUDA -- what would that be -- module, I guess. And they're kind of globals available here. We can create our shared array here because we say shared.array0.
This is actually quite a new thing in number. It does the dynamic approach. So when you call the kernel rather than using triple angle brackets, you use square brackets, passing in the blocks, threads per block, stream number which we haven't learned about yet, and the dynamic shared memory size.
And so here is where it creates it with a dynamic shared memory size. Tell it that you want them to be floats. And so now we can do the exact same trick that we did before. Grabbing our MS and NS. Instead of underscore, underscore sync threads, it's CUDA.sync threads.
So in some ways I'd say, like, okay, this is not necessarily a big win. But there's a couple of things that do make it a big win. So one I'll show you, for instance, is -- I mean, we could just do something pointless like a times one here. There we go.
So that should force it to recompile the kernel. Okay, run. There we go. Done. So it took less than a second to recompile the kernel. So for some reason which I don't fully understand, compiling number kernels, CUDA kernels, is way faster than compiling C and C++ CUDA kernels. And I have asked an NVIDIA guy about this, and he was like, oh, well, it's just how it is.
Sorry. It doesn't seem to be an obvious way to make the C, C++ version faster. So I actually think this is great for doing development, is I can, you know, have actual CUDA running and just change things and run it very fast. So I think that's very handy. The second thing that's very handy is that I don't have to flatten my tensors.
M and N here are being passed in -- actually, M and N. The only thing I've done to them is wrapped them with as CUDA array, which is a take zero time. It's just changing the type, basically. So you don't have to flatten it. So I can actually use proper indexing notation, which is convenient.
That's another nice thing. I can do things like dot shape, so I don't have to pass in the H, K, and W, which, again, is quite nice. So there's some conveniences. But then I'm going to tell you the most amazingly cool thing, which is the Python thread thing we created back here that kind of simulates threads and simulates CUDA in Python is fully built in to number.
So everything that we kind of recreated from scratch here actually already exists. And so in number, to use it, if you Google for number CUDA simulator, you'll see here that if you set the environment variable number enable CUDA sim to one, then that enables the CUDA simulator. The code is executed as normal, except that it's actually run on the CPU as pure Python code, just like ours was.
So you can, for example, set a break point or print stuff directly from Python. Now notice, because this is not running CUDA, it's going to be slow. It's going to be exactly as slow as our manual Python version, because this is just their Python, manual Python version, or I think it's exactly as slow.
So you still want to use much smaller subsets of your data. But this is a great way to actually, in my opinion, to do real world CUDA development is do it in number. Do it all with number enable CUDA sim set to one with small amounts of data until everything works.
And you have to, by the way, you have to set that environment variable before you import number, right? So you would have it before you import number. And if you're using a notebook, you'd have to reset the kernel, restart the kernel, and then change the environment variable and then reimport number.
And then you can set it to zero, and now the exact same code will now be running on the GPU. And then I've tested this. If you then take your code and paste it into chat GPT and say, please convert this into CUDA C code, for me, at least, it did it perfectly correctly first time.
So I think this is a really useful way to kind of combine all the stuff we've learned about from first principles. And we've done it all from scratch. And so we understand how it all works. But now to implement it in practice, maybe the easiest way to do that is actually to use number.
Now, of course, you don't even need to convert it to C or C++. You could just leave it in number. The challenge is from a deployment point of view, you know, it might be a bit more tricky. With PyTorch, if you use our load inline, load CUDA approach, the documentation explains how you can precompile that and actually provide a pip or conda installable package that people can just use right away without having any of the CUDA development toolkit installed.
The number, that's not true. Having said that, if you do install number from conda, it automatically installs all the stuff you need for the toolkit. So maybe that's okay. So anyway, these are some things like pros and cons to think about. So maybe you just just use number as is.
Maybe it's a little bit slower. So maybe that'll be a problem. Or maybe you auto-convert it to CUDA C and actually use that in practice. Yeah. So I think that basically covers everything. Any more questions or anything anybody wanted to add? From my side, first of all, I must say, this was a super fantastic session.
I learned a lot. And I didn't expect that you would go so deep into the Metamol stuff. And also I think this shows so many elements of the CUDA development. It's starting from having this single character variables that you normally see. And it also maybe shocks people if they see curves for the first time.
It makes it a little bit inaccessible in the first class because you just see this variables in the class and multiply whatever. So magic happens. That's what you showed this, like the starting from this drawing, all the memory, like basically the structures look like and what you need to do.
And then reference back to this, because normally in the first approach, you already get something wrong. And looking back, where do the variables come from? This is why I'm full. And I also have mine, always, some pencil and paper beside me. Yes, marvelous. Thank you. Yeah. There are also a few things that stood out for me.
I think if more people are interested in a lot of ship number kernels, that's something we can certainly take a look at. As far as I know, I think number did have an ahead-of-time compilation mode, which should make some stuff easier. But because it's all sort of old Python, you can ship it.
You just have to ease the compilation cost. Yeah. The AOT ahead-of-time compilation is deprecated as of, what is this, February 2024. They say they're going to replace it with something newer and better, but they haven't said what that is yet. So that's currently an outstanding question. They did say they won't remove the previous AOT approach until the new approach is working and everything.
So yeah, hopefully, by the time people watch this video on YouTube in the future, maybe this will all be fully resolved. So we have a question here from Jonas, who wants to know if you have checked it out, how it compares to Q+ to the optimized tutor library, or maybe also to the PyTorch metrics modification as a baseline.
I haven't because I'm not a CUDA expert. I actually don't know how to optimize all these shared memory sizes and tiles and blah, blah, blah. So I know that stuff like Kuberless has a whole lot of-- so actually, one of the things you might have noticed is I changed my input matrix sizes from last time.
Last time, I used the MNIST data and a kind of a pretend set of weights for MNIST. And so the output was 50,000 by 10. And that really kind of long, narrow matrix is particularly hard to optimize, because with a tile width of 32, for example, most of it's padding.
So I actually used kind of a simpler-- not your old shapes to make this a bit easier for me to think about. So I think it'll be a fun exercise as we go further to see if we can figure out for that like a one layer MNIST model, can we create something that is close in performance to what Q+ or QDNN does?
Because yeah, I think it's kind of-- I found it quite tricky to think about how I would do all that automatically. There are things like TVM, which maybe one day we can look at TVM together. I know Thomas Feynman says he's used that. Yeah, so maybe he can even help us there, which is something which can kind of automatically optimize these and a lot more details for you.
And then also, I know sometime hopefully in the next month or so-- so sometime around late February or March, 2024, Mojo GPU should be becoming available, at least in a preview form. And that has an autotune functionality which might help us to automatically find the best parameters as well.
But yeah, for now, I didn't even bother checking because I suspected I was going to be quite embarrassed at how much further there is to go. Well, I think this is a super good opportunity for the community because you have this baggable notebook which can be-- yes, everybody can fork it and play around with it and try out different stuff, like make performance measurements and it will be-- I'm pretty sure that somebody can make reports on things and experiment with it and maybe we can look at what we've found.
So the current state isn't-- I think I'm closer to what state-of-the-art with this metrics multiplication. And I think also the session today played the foundation for further stuff like special currents, technology from tensor cores, for example, from NVIDIA, which is specifically in the hardware, the further hardware features for sitting metrics multiplications.
So thanks for keeping it in the future, maybe. Great. So for what's worth, I think getting something less competitive is probably going to be very difficult, at least on basically the server's use of things like A100s. I suspect that's not as true for consumer-only use. So that's potentially like because it wants to be less attention from the video.
Good point. So MikeG, Misa wants to know what is PyTorch currently using for metrics multiplications, I guess. Do you know? Yeah. So some writers mostly still use as like a loss. There is like an experimental-- with if you use PyTorch compile, there's a flag called torch.enductor.config. I think it's off by default.
But, you know, it's something we're potentially interested in exploring. But I think as far as today, it's mostly still the loss. The way you can tell, by the way, is if you launch the PyTorch profiler, the function names will have specific signatures to sort of say, OK, it's using a loss, it's using test records.
So like a profile trace as well would be really different from what you're trying to think about. And Jeremy, what you said, I think, regarding this speed of compilation, for me personally, this is super important in getting like, experimenting with things. I was trying to optimize for this, and I think it's a big advantage if this is in-- well, it's really much faster and you're running and you succeed, and you're voicelessly waiting for the next result after you get into the failures you went through.
Exactly. Yeah, you need a quick iteration loop. So I think between the CUDA simulator and the fast number CUDA JIT, it can make life a lot better. I think there were two more general questions regarding Chagipiti use. I think one was whether Chagipiti could, because it was fusing much bit corners, or is this like what the limits basically are for what Chagipiti can do, because I think it's take how to do that.
And you have to try it. Let's try it. That'd be an interesting thing for people to experiment with, wouldn't it? See how far we can go. I think, in general, people tend to underestimate maybe what Chagipiti can do. So yeah, why don't you try some things that maybe you suspect might be a bit too hard for it, and we'll find out where the limits are.
For example, this-- I put that prompt in-- well, so when I converted number into CUDA, it automatically changed the number shared memory. In my prompt, I had something saying replace sync_b.wait with __sync_threads. I didn't try doing it without it. Maybe it would have guessed. Personally, I haven't found it at all useful for anything remotely novel.
So I found it really useful for using languages I'm not that familiar with, or frameworks I'm not that familiar with, and it gets me-- or calling some API. I find it really good for that. But for doing anything at all algorithm-related, which is anything other than just replicating a well-known algorithm, I've found it terrible.
So at least the kind of work I do, which is kind of-- because it's research-oriented, so most of what I write is pretty new, I haven't found it at all useful. So at least I think my work's safe for a while. I don't know about yours. Yeah, a little bit.
I mean, it's-- I'm not an expert. I know you guys know a lot more than me. So I mean, Triton's different in that in Triton, you can have a matrix multiplication inside. You can have @ inside your kernel. And Triton's really clever at optimizing these much more sophisticated things.
So number's a lot more basic, really. It's just a mapping of the CUDA-C concepts directly to Python concepts. Triton is a fairly recent, literally a PhD thesis artifact. So it's doing something a lot more clever. I mean, there are similarities. It works with a decorator. It converts Python code to GPU code.
I think they're good for different things, because Triton is somewhat limited as well. It's very, very smart, but it's not a mapping of the entire CUDA programming model. So for example, when I know at Meta, when you guys, Horace and those guys did the GPT fast thing and wanted to do 4-bit discretization, you found that you couldn't do it in Triton.
And that's because Triton doesn't have any way to express that at the moment. So yeah, I think they both have their place. Do you guys feel the same way? Yeah, so we are going to have Charles, who is the author of the GPT fast kernel, give us a talk in two weeks.
So he's going to sort of tell us the first time it'll happen. I think when people ask this question, the motivation is sort of can you avoid learning CUDA? And after that, it's like that's a negative. Does seem to be, yeah. So when I'm like learning both, and trying it will just be slightly easier to ship some sort of useful kernel, but you're going to sort of run into the limits of the language.
Yeah, and I'm not even sure it's easier to use Triton. I feel like Triton is more complex in many ways. So once you know CUDA, then you can find the places where Triton can help. I think trying to use Triton effectively if you didn't know CUDA would be an even harder path, especially now that we've kind of figured out these ways of doing iterative notebook based CUDA development, which is one of the big benefits of Triton is just it's a decorator and it's Python and stuff.
So, yeah. Okay, so I think then this was wonderful session today. Thank you so much, Henry. Thank you. Thank you so much for the opportunity now to work on this. And yeah, fantastic, a really deep dive into a metrics modification. Bye, everybody. Thanks for joining.