Lesson 1: Practical Deep Learning for Coders
Transcript
So, Rachel and I started FastAI with this idea of making neural networks uncool again. It is a grand plan to be sure because currently they are terribly cool. But really there are some things that we want to see improve and that's why we're doing this course. We're actually not making any money out of this course.
We're donating our fees both to the Diversity Fellowships that we're running and also to the Fred Hollows Foundation. I would like to briefly give a quick pitch for the Fred Hollows Foundation, for those of you who aren't aware of it. Because as you know, deep learning is fantastic for computer vision.
It's basically allowing computers to see for the first time. What you might not realize is that there are something like 3 or 4 million people in the world who can't see because they have something called cataract blindness. Cataract blindness can be cured for $25 per eye. And actually the group of people who got that price down from thousands of dollars to $25 was Fred Hollows, who was the Australian of the Year some years ago.
He's passed away now, but his legacy is in this foundation where if you donate $25, you're giving somebody their sight back. So as you learn to teach computers how to see, Rachel and I are also donating our fees from this to helping humans to see. So we think that's a nice little touch.
So we're doing this both to help the Fred Hollows Foundation, but more importantly to help something we care a lot about, which is making deep learning more accessible. It's currently terribly exclusive. As I'm sure you've noticed, resources for teaching it tend to be quite mathematically intensive. They really seem to be focused on a certain kind of ivory tower type audience.
So we're trying to create training and examples which are for non-machine learning and math experts dealing with small data sets, kind of giving raw models of applications you can develop quickly. And today we're going to see how to create a real useful piece of deep learning code in seven lines of code.
We want to get to the point where it's easy for domain experts to work with deep learning. There are a lot of domain experts here, whether you're working with getting satellites in the air or whether you're working with analyzing the results of chemical studies or whether you're analyzing fraud at a bank, and I know all those people here in this audience, you are domain experts that we want to enable to use deep learning.
At this stage, the audience for this course is coders, because that's as far as we think we can get at this point. We don't need you to be a math expert, but we do need you to be coders, and I know all of you have been told of that prerequisite.
With your help, we can get to the point where non-coders will also be able to participate in this. The reason why we care about this is that there are problems like improving agricultural yields in the developing world, or making medical diagnostics available to those who don't have them, or so forth.
These are things that can be solved with deep learning, but they're not going to be solved by people who are at these more ivory tower firms on the whole, because they're not really that familiar with these problems. The people who are familiar with these problems are the people who work with them every day.
So for example, I've had quite a bit to do with a lot of these kinds of people, such as through the World Economic Forum, I know people who are trying to help cure TB and malaria, I know people who are trying to help with agricultural issues in the developing world and so forth, and these are all people who want to be using deep learning for things like analyzing crop imagery from satellites, or my most recent startup, which was analyzing radiological studies using deep learning to deal with things like the fact that in the entire continent of Africa, there are only seven pediatric radiologists.
So most kids in Africa, in fact most countries in Africa, no kids have access to any radiologists and therefore have no access to any kind of modern image-based medical diagnostics. So these are some of the reasons that we're creating and running this course, and so we hope that the kind of feel of this community is going to be very different with the kind of feel of a lot of the deep learning type communities that have appeared before that have been all about let's trim 0.1% of this academic benchmark.
This is going to be all about let's do shit that matters to people as quickly as possible. Sometimes to do that, we're going to have to push the state of the art of the research, and where that happens, we won't be afraid to show you the state of the art of the research.
The idea is that by the end of Part 1 of this, you will be able to use all of the current best practices in the most important deep learning applications. If you stick around for Part 2, you'll be at the cutting edge of research in most of the most important research areas.
So we're not dumbing this down by any means, we're just refocusing it. So the reason why we're excited about this is that we have now the three pieces of this universal learning machine. We now have the three critical pieces, like an infinitely flexible function, all-purpose parameter fitting, which is fast and scalable.
So I'll tell you what I mean about these three pieces. The neural network is the function, we're going to learn about exactly how neural networks work. But the important thing about a neural network is that they are universal approximation machines. There's a mathematical proof, the universal approximation theorem, that we're going to learn all about which tells us that this kind of mathematical function is capable of handling any kind of problem we can throw at it.
Whether that mathematical function be how do I translate English into Hungarian, or whether that mathematical function is how do I recognize pictures of cats, or whether that mathematical function is how do I identify unhealthy crops. It can handle any of these things. So with that mathematical function, the second thing you need is some way to fit the parameters of that function to your particular need.
And there's a very simple way to do that, called gradient descent, and in particular something called backward propagation, which we will learn all about in this lesson and the next lesson. The important thing is that these two pieces together allow us to start with a function that is in theory capable of doing anything and turn it into a function that is in practice capable of doing whatever you want to do, as long as you have data that shows examples of what you want to do.
The third piece, which has been missing until very recently, is being able to do this in a way that actually works with the amount of data that you have in the time you have available. And this has all changed thanks particularly to GPUs. So GPUs are graphics processing units, also called video cards, that's kind of an older term now, also called graphics cards.
And these are devices inside your computer which were originally designed for playing computer games, so it's kind of like when you're looking at this alien from the left-hand side and there's light coming from above, what would each pixel, what pixel color do I need for each place? That's basically a whole bunch of linear algebra operations, a whole bunch of matrix products.
It turns out that those are the same operations that we need for deep learning. And so because of the massive amount of money in the gaming industry that were thrown at this problem, we now have incredibly cheap, incredibly powerful cards for figuring out what aliens look like. And we can now use these, therefore, to figure out how to improve medical diagnostics in Africa.
So it's a nice, handy little side effect. GPUs are in all of your computers, but not all of your computers are suitable for deep learning. And the reason is that programming a GPU to do deep learning really requires a particular kind of GPU, and in practice at the moment, it really requires a GPU from Nvidia because Nvidia GPUs support a kind of programming called CUDA, which we will be learning about.
There are other GPUs that do support deep learning, but they're a bit of a pain, they're not very widely used. And so one of the things we're going to be doing is making sure that all of you guys have access to an Nvidia GPU. The good news is that in the last month, I think, Amazon has made available good quality Nvidia GPUs for everybody for the first time.
They call them, very excitingly, their P2 instances. So I've spent quite a bit of the last month making sure that it's really easy to use these new P2 instances, I've given you all access to a script to do that. Unfortunately, we're still at the point where they don't trust people to use these correctly, so you have to ask permission to use these P2 instances.
The Data Institute folks, for anybody who does not yet have an AWS P2 instance or their own GPU server, they are going to collect all of your AWS IDs and they have a contact at Amazon who will go through and get them all approved. They haven't made any promises, they've just said they will do what they can.
So they're aware of how urgent that is, so if you email your AWS ID to Mindy, she will get that organized. We'll come back and look at AWS in more detail very shortly. The other thing that I've done is on the wiki, I've added some information about getting set-up.
There is actually quite an interesting option called OVH. I'm sure by the time this is a MOOC, there's going to be a lot more, but this is the only company I've come across who will give you a by-the-month server with decent deep learning graphics cards on it. And it's only $200.
And to give you a sense of how crazily cheap that is, if you go to their page for GPU servers, you'll see that this GTX 970 is $195 a month, and then their next cheapest is $2000 a month. It just so happens that this GTX 970 is ridiculously cheap for how good it is at deep learning.
And the reason is that deep learning uses single precision arithmetic, in other words it uses less accurate arithmetic. These higher-end cards are designed for fluid simulations and tracking nuclear bonds and stuff like that that require double precision arithmetic. So it turns out these GTX 970s are only good for two things, games and deep learning.
So the fact that you can get one of these things which has got two GTX 970s in, this is a really good deal. So one of the things you might consider doing in your team is maybe sharing the cost of one of these. $200 a month is pretty good compared to worrying about starting and stopping your 90 cents per hour AWS instance, particularly if AWS takes a while to say yes.
So AWS, how many people here have used AWS before? Maybe a third or a half. So AWS is Amazon Web Services, I'm sure most of you if not all of you have heard of it. It's basically Amazon making their entire backend infrastructure available to everybody else to use. So rather than calling it a server, you get something they call an instance.
You can think of it as basically being the same thing, it's a little computer that you get to use. In fact, not necessarily little. Some of their instances cost $14 or $15 an hour and give you like 8 or 16 graphics cards and dozens of CPUs and hundreds of gigabytes of RAM.
The cool thing about AWS is that you can do a lot of work on their free instance. You can get a free instance called a t2.micro, and you can get everything set up and working on a really small dataset, and then you can switch it across, if you want to then run it on a big dataset, switch it across to one of these expensive things and have it run and finished within an hour or two.
So that's one of the things that I really like about AWS. Microsoft also have something a lot like AWS called Azure. Unfortunately, their GPU instances are not yet publicly available. I've reached out to Microsoft to see if we can get access to those as well, and I'll let you know if we hear back from them.
So one of the things that Rachel has done today is to start jotting down some of the common problems that people have found with their AWS installs. Getting AWS setup is a bit of a pain, so we've created a script that basically will do everything for you. But the nice thing is that that script is very easy for you to have a look at and see what's going on.
So over time, you can get a sense of how AWS works. Behind the scenes, AWS is using their command line interface, or CLI, which we've given you instructions on how to install. As well as using the CLI, you can also go to console.aws.amazon.com and use this graphical interface. In general, I try to avoid using this graphical interface because everything takes so much longer, and it's so hard to get things to work repeatedly, but it can be nice to kind of look around and see how everything is put together.
And again, we're going to come back and see a lot more about how to use the graphical interface here, as well as how to create and use scripts. So these are some of the pieces that we want to show you. I wanted to talk a bit more before we go into more detail about some of the interesting things that we've seen happening in deep learning recently.
Perhaps the thing that I found most fascinating recently was when one of the leading folks at Google Brain presented this at a conference at Stanford which showed the use of deep learning at Google, and you can see this is just 2012 to today, or maybe two months ago. It's gone from nothing to over 2,500 projects.
Now the reason I find this interesting is because this is what's going to happen to every organization and every industry over the next few months and few years. So they've kind of described how at Google it's getting used pretty much everywhere, and you can imagine probably if they redid this now today, two months later, it's probably going to be somewhere up here.
So we kind of felt like it would be great to help kickstart lots of other organizations to start going up this ramp. That's another reason we're doing this. I really like looking at applications, and we started seeing some examples of these kind of like deep learning amateurs applications if you like.
This is an example of it. What these guys did is they're not machine learning or deep learning experts, they downloaded a copy of Cafe. They ran a pre-existing model. This is what we're going to learn to do today, run a pre-existing model and use the features from that model to do something interesting.
In their case, the thing they decided to do that was interesting was to take data that they already had, because they're skin lesion people, and analyze skin lesions. These are the different kinds of skin lesions that you can have, and they found, for example, that the previous best for finding this particular kind of skin lesion was 15.6% accuracy.
When they did this off-the-shelf Cafe pre-existing model with a simple linear thing on top, they quadrupled it to 60%. So often when you take a deep learning model and use the very simple techniques we'll learn today, you can get extraordinarily upticks compared to non-deep learning approaches. Another example of that was looking at plant diseases, and there's been at least two groups that have done this in the last few months, and again, very successful results from people who are not deep learning or machine learning experts.
Similar results in radio modulation. So these folks who are elect and computer engineering people found that they could double the effective coverage area of phone networks and stuff like that. So this is a massive result. And again, they used very simple approaches. It's being used in fashion, it's being used to diagnose heart disease by hedge fund analysts.
So there's a particular post which I found really inspiring actually in trying to put this together, which is that Keras, which is the main library we'll be using, the author of that put together this post showing how to build powerful models using very little data. I really just wanted to give a shout out to this and say this work that Francois has been doing has been very important in a lot of the stuff that we're going to be learning over the next few classes.
The basic environment we're going to be working in most of the time is the IPython notebook or the Jupyter notebook. So let me just kind of give you a sense of what's going on here. When you have a Jupyter notebook open, you will see something which is a good time to show you about starting and stopping AWS instances.
So I just tried to go to my notebook on AWS and it says it can't be reached. So my guess is that if we go back to my console, you can see I have zero running instances, so I've got zero servers currently running. So if I click that, I will see all my servers.
Normally I would have one P2 server or instance and one T2 because I used the free one for kind of getting everything set up and then used the paid one once everything is working. Because I've been fiddling around with things for this class, I just have the P2 at the moment.
So having gone here, one way I could start this is by going start here. But like I said, I don't much like using this GUI for stuff because it's just so much easier to do things through the command line. So one of the things that I showed you guys that you could download today is a bunch of aliases for making starting and stopping AWS really quick.
If you haven't got them yet, you can find links to them on Slack, or you can just go to Platform.ai/files and there's a bunch of different things here. This AWS alias.sh is a file that sets up these various aliases. So the easiest way to grab stuff on your AWS instance or server is to use something called WGet.
I would right-click on this and choose Copy Link Address and then go WGet and paste in that and that will go ahead and download that file. Now I already had one so I created a copy of it. We can take a look at that file and you'll see it's basically a bunch of lines that say alias something equals something else and it's created AWS get P2, AWS get T2, AWS start, AWS SSH, AWS stop.
I'm going to show you what these things do because I find them pretty convenient. Basically if I run AWS get P2, so first of all I say source AWS alias.sh and that just runs that file. In bash, that's how you just run a file. And that's now caused all of those names to appear as aliases to my system.
So if I now run alias get P2, that's going to go ahead and ask Amazon for the ID of my P2 instance. Not only does it print it, but it's going to save it into a variable called instanceID and all of my other scripts will use $instanceID. So I now want to start that instance, so I just type AWS start and that's going to go ahead and do this equivalent thing of going to the GUI, right-clicking, choosing start.
The other nice thing it does is it waits until the instance is running. And then at the end it asks the queries for the IP address and prints it out. Now this script that I have given you guys to set up these instances uses something called an elastic IP that actually keeps the same IP address every time you run it.
So you should find that IP address stays the same, which makes it easier. So there is the IP. So I then have something called AWS SSH and AWS SSH will go ahead and SSH into that instance. So all it does is basically use the username ubuntu, because that's the default username for this kind of image on AWS, and then $instanceIP, so that's that IP address we just got.
The other thing it does is to use the private key that was created when this was originally set up. Now in my case, I've actually moved that private key to be my default key, so I don't actually need that minus IP. So I just type ssh ubuntu at $instanceip, but you can just type aws-ssh, and you'll see bang, here we are.
So we are now inside that AWS image. One of the handy things about AWS is they have these things called AMIs, Amazon Machine Images, and an AMI is basically a snapshot of a computer at a particular point in time. And you can start your own instance using a copy of that snapshot.
So in the script I've given you guys, I've created and provided an AMI which has all the stuff we want installed. So that's why it is that when you use that script and log into it, you can start running things straight away. So let's do that right now. I've created a directory already for you called nvs for notebooks.
So we can go ahead and type jupyter notebook. And this is how we ask Amazon to set up a jupyter notebook server for us. And when it's done, it says okay, the jupyter notebook is running at all IP addresses on your system, 8-8-8-8. So what is our IP address?
Well, it told us up here when we started it, it's 52 blah blah blah. So I'm going to go to my instance and I'll go 52, 40, 116, 116, in my case, colon, and it told me that the port is 8-8-8-8, so colon 8-8-8-8. So I'm just typing in that here, press enter, and I put too many colons.
That's better. I've set up a password and it's just dl_course. We can look later on at how to change that password if people want to, but it'd be handy to have a password there for everybody if you want to start looking at some of your own data. And actually by default, it's not going to show you anything, so I'm going to delete that.
So now we can just go ahead and say new notebook, and just say python condor root. And this sets up a scientific computing environment for you where you can type python commands and get back responses. So 1 plus 1. There we go. It seems to be computing things correctly.
So the basic idea here is that over there on Amazon, you have your server. It is running a program called Jupyter Notebook. Jupyter Notebook is causing a particular port which is 8-8-8-8 to be opened on that server, where if you access it, it then gives you access to this Jupyter Notebook environment.
In your team, you guys can all use the same Jupyter Notebook if you want to, or you could run multiple Jupyter Notebooks on one machine. It's really pretty flexible. So now that I've created one, I could rename this, say, this is Jeremy's Notebook. And so then Rachel might come along and be like, oh, I want to run something as well.
So she goes new and her computer, and it creates a whole new one over here. And she could save file, rename, Rachel's Notebook. So if I now go back here, you can see both of these notebooks are shown to be running. So the server is running multiple kernels, they're called.
And you can see back here, it's saying "creating new notebook, kernel started". So each of those are totally separate. So from one of them, I say "name = Rachel", and in the other one, I say "name = Jeremy", and then over here, I say "name". You'll see that they are not in any way talking to each other, they're totally separate.
So that's a super handy way to do work. The other nice thing is that you can not just type code, but you can also type markdown. So I could go to section, I want to talk about something here. And so as I do that, it allows me to mix and match information and code.
And every piece of code that comes out, I can see where it came from. And it also, as you'll see, lets us put in visualizations and plots and so forth. So some of you may have come across this important concept called literate programming. Literate programming is the idea that as you code, you are documenting what you're doing in a very deep way, not just for others, but maybe more importantly for yourself.
And so when you're doing data science work, work like a scientist. How many people here are in some form scientists or have been scientists? You guys will know the importance of your journal notebook. The greatest scientists, they're all stories about the kinds of notebooks they kept and how their lab notebooks worked or their lab journals worked.
This is critical for data scientists too. This idea that as you do experiments, you're keeping track of what did I do, what worked, what didn't work. I can see all the people who put their hand up as scientists are all nodding right now. So this makes it super easy to do that.
So be helpful to yourself and to your team by taking advantage of this. Now in order to learn to use this environment, all you have to do is press H. And when you press H, it brings up all of these keyboard shortcuts. After not very long, you will get to know all of them because they're all extremely useful.
But the main ones I find particularly helpful is you hit M to turn into markdown mode. So that's the mode where you can enter text rather than code, or Y to switch it back to code again. And you certainly need to know Shift+Enter, which evaluates the cell and gives you a new cell to enter into.
And you also need Escape, which pops you out of entering information and gets you back into this command mode. And then Enter to go back into edit mode again. So just to show you that. Enter to get into edit mode, Escape to get out of edit mode, Shift+Enter to evaluate.
And you can see as I move around, it changes which one is highlighted. I've started to create some resources on the wiki for helping you with Jupyter Notebook. It's still pretty early, but you guys I'm sure can help by adding more information here. One of the things I particularly mentioned is that there are some good tutorials.
I thought I had also mentioned my favorite book, which I now can't see here, Python Libraries. Python for Data Analysis by Wes McKinney. It's a little old. It also covers pandas a lot, which you don't need, but it's a good book for getting familiar with this basic kind of Python scientific programming stuff.
So the last kind of ingredient that I want to introduce is Kaggle. How many people here have been to or done anything with Kaggle at any point? About a third of you. Anybody who is in the master's program here, I'm sure will have used Kaggle or shortly to use Kaggle, mainly because it's just a great place to get all kinds of interesting datasets.
So for example, if you wanted to test your ability to do automated drug discovery, you could go to Kaggle and download the files for the Merck Molecular Activity Challenge, run some models and test them to see how they compare to the state of the art by comparing to the leaderboard.
So Kaggle is a place where various organizations run machine learning competitions. They generally run for about three months. It's super cool because they get archived essentially forever. You can download the data for them later on and find out how you would have gone in that competition. Generally speaking, if you're in the top 50%, that means you have an okay-ish model that is somewhat worthwhile.
If you're in the top 20%, that means you have a very good model. If you're in the top 10%, that means you're at an expert level for this type of problem. If you're in the top 10, it literally means you're one of the best in the world. Because every time I've seen a Kaggle competition -- I used to be president of Kaggle, so I'm very familiar with this -- every time I've seen a Kaggle competition, at least the top 10 generally all beat the previous best in the world and generally are from really good machine learning experts who are going beyond anything that's been done before.
It seems that the power of competition pushes people way beyond what the previous academic state of the art was. So Kaggle is a great environment to find interesting datasets and to benchmark your own approaches. So we're going to be using it for both of these purposes. Our first challenge will be dogs versus cats.
So sometimes on Kaggle, they run competitions that are not done for lots of money, but sometimes they're done for free or for a bit of fun. In this case, it was actually done for a particular purpose which was, can you create an algorithm that can recognize the difference between dog photos and cat photos?
And the reason why was because this particular organization was using that problem as a capture. In other words, to tell the difference between humans and computers. It turned out that the state of the art, machine classifiers, could score 80% accuracy on this task. So really, this group wanted to know, can you surpass the state of the art?
Is this a useful capture? And then if you can surpass the state of the art, can they then use this kind of dogs versus cats recognizer for their pet finding work, which is what they were doing? So really the goal here was to beat 80%. Now this is a great example of the kind of thing which you could use for a thousand or million different purposes.
For example, the work I did in cancer detection is this. So if you take a CT, or an X-ray, or an MRI, and you say to a deep learning algorithm, these people have malignant cancer, these people don't, it's the same as cats versus dogs. If this is a healthy, high crop yield area from satellite photos, this isn't, that's cat versus dogs.
If you say this is one kind of skin lesion and this is another kind of skin lesion. If you say this is an abstract painting and this is not. This is an extremely valuable painting and this is not. This is a well-taken photo and this is not. They're all image analysis problems that are generally classification problems.
These are all examples of things people have done with this kind of technology. So cats versus dogs, it turns out, is a very powerful format, and so if we can learn to solve this well, we can solve all of these kinds of classification problems. Not just binary, so not just is it this group or that group, but also things like that skin lesion example.
These are 10 different types of skin lesions, which type is it? Or the crop disease example, which of these 13 crop diseases are we looking at here? An example of an actual thing that I saw, I can probably find it, was cucumber analysis. Cucumber deep learning. There can't be too many things with those particular keywords, there we go.
A Japanese cucumber farmer used this approach to deep learning to do the automated all their logistics and basically had a system that would put the different grades of cucumbers into different bins automatically and make their cucumber workflow much more efficient. So if that was your idea for a start-up, it's already been done, but there's many more.
So they are all of our basic pieces. So to get started, here we are with this AWS server with a pretty empty looking set of notebooks here. So we want to go ahead and start getting some work done. So to do that, we need to download the basic files that we need.
So I've sent you all of this information already. All of the information you need is on our platform.iai website. All of the notebooks are in files/NVs. So what I'm going to do is, actually I'm going to show you a cool little trick. I'm going to press Ctrl+C twice, that shuts down the notebook.
So the notebook is not running. Don't worry, it saves itself automatically on a regular basis, or you can just hit S to save it right now. So shutting down the notebook, as you'll see, the Python notebook files are still sitting there. And you can see actually that behind the scenes, they're just big bunches of JSON text.
So you can stick them in GitHub and they'll all work perfectly well. What I generally like to do is run something called Tmux. How many people here have used Tmux or Screen before? Less than I expected. So those of you who haven't, you're going to love this trick. Tmux and Screen are programs that let you run programs on your server, close your terminal, come back later and your program will still be running in the exact same way.
I don't remember if Tmux is already installed, it is. So to use it, you just go Tmux. And it looks like nothing happened, except a little green bar has appeared at the bottom. But if I now hit Tmux's magic command, which is Ctrl+B and press question mark, you can see there are lots of keystrokes that it has ready for me to use.
And so one of the ones I like is Ctrl+B double quote, which creates a second window underneath this one, or Ctrl+B percent, which shows a second window next to this one. And so I tend to set up a little Tmux session and get it all set up the way I want.
So I'm not going to go into detail about how to do everything I show you. What I really want to do in the class is to say, here's something that exists, here's something I recommend using, here's what it's called, and during the week, you can play with it, you can ask questions, you can use it in your team, and so forth.
So here it is, it's called Tmux, this is what it does, and I'll show you something cool. If I now go Ctrl+B and then D to detach, close out of this altogether, it's all gone. So if I now go back into my server, I wasn't able to SSH in properly because currently $instance.ip is not defined.
And the reason for that is that I have to -- this is good, I get to show you lots of steps -- rather than every time I start sourcing my aws-alias.sh file, what I should do is I should go vim.bashrc.bashrc is a file that is run every time you run bash.
And if I edit my bashrc file, and at the end I type source aws-alias.sh, and just to show you, I'm going to close it and re-open it. If you're wondering why my computer is going so slowly, it's because when you have these big Skype calls running at the same time as green recording, everything slows down.
So you can see now all those aliases are there. So before I SSH to $instance.id, I have to find out my correct IP address. So I can say aws-get p2, get my instance ID, and then we can -- you know what, I'm not sure I've got something here to actually just get the IP address.
So that's interesting. As you can see, I'm kind of playing with this a little bit as I go, so I'm going to go ahead and show you how to do this. So right now, the IP address only gets printed out when I start an instance. In this case, I've already got an instance running, so I'm going to edit this script and I'll change it later on.
So basically I'm going to create a new alias called aws-ip, and I'm going to get rid of the bit that starts the instances, get rid of the bit that waits for it to be running, and I'm just going to keep the bit that says instance-ip equals something, something, something.
So I'm going to call this aws-alius.sh, and I've got a new alias called aws-ip, and now I can go ssh-ubuntu@dollar-instance-ip. Having said all that, because my IP address is going to be the same every time, and I couldn't really be bothered waiting for all that, I'm going to manually put my IP address in here.
So the next time I run this, I can just press up arrow and just rerun that command. So I'm showing you lots of ways of doing things, so you can decide what your own workflow is like or come up with better ones. So here's the cool thing, I'm back in my box here, and then if I say tmux-attach, I am exactly back to where I came from.
So whatever I had running and whatever it said it was, it's still sitting there. So the particularly cool thing is that any notebooks, kernels I had running, they're all still sitting there. This is particularly helpful if you run something like those OVH servers or one of your own servers.
In the AWS, it's a little less helpful because you really need to shut it down to avoid paying the money. But if you've got something you can keep running, for all the MSAM students, you will have access to the GPU server we have here at the University, which is particularly helpful for you guys.
So I actually tend to use this little bottom right-hand window to permanently have Jupyter notebook running. So that's kind of like my particular way of running. And then I tend to use this left-hand window to kind of do other things. And in particular, I'm going to go ahead and grab my notebooks.
So the easiest way to grab things is with wget. I now have a notebook, Lesson 1, and so if I go back to my Jupyter notebook, see it's appeared, Lesson 1, and if I click on it... If you're using a T2 instance, the free ones, generally speaking, particularly the first time you run something it can take quite a long time to open.
You should find the second time it's quite fast by the way. So here is our notebook, and so hopefully quite a few of you have already got to the point today that you can see this, those of you that haven't will get plenty of help during the week. This particular notebook uses two external scripts to help, those scripts are called utils and vgg16.
So the last thing I'm going to do before I break is to grab those, and just pop these all in this notebooks directory, so they're all in the same place, vgg16, wget, then unzip them, and then the only other thing you need is the data. So the data sits in the platform.ai data directory, and the data is all the dogs and cats.
Now I've taken the Kaggle data and made changes to it, which I'm going to be showing you. So rather than downloading it from Kaggle, I suggest you grab it from platform.ai, and I've sent you this information today as well. So I'm going to cd into data, and wget that as well.
And so that's going to run for a few minutes, and so while it does, I think it's a good time to have a break. Let's have a 10 minute break during which you are welcome to keep going with your install, chat to myself or Rachel or Tyro or Jad if you've got any questions, or get to know your team or just go and have a coffee.
So let's get back together at 5 past 8. The previous section, I think, for some of you, and I was chatting to a couple of you during the break, was a bit of a fire hose of information because it was like, here's Bash, here's AWS, here's Kaggle, here's GPUs, blah, blah, blah.
For some of you, it was probably really boring. Most practicing data scientists are probably using all of those things already. So if you're at one extreme of the fire hose of information, don't worry. We have all week to get through it, you'll have the video tomorrow, and by the time you're here again next week, I want to make sure that everybody who has the time and interest to work hard on it has got through all of the material.
If you haven't, like you're a couple of days, maybe it's early on the weekend and you're thinking you're not going to get there, please let Rachel and I know, we will work with you in person to get you there. Everybody who puts the time in, I am determined to make sure can get through the material.
If you don't really have the background and you don't really have the time, that's fine. Maybe you won't get through all of the material, but I really am determined that everybody who's prepared and able to put in the time can get through everything. So between the community resources and the video and Rachel and I and folks like Taro and Yad, we will help everybody.
To those of you who are kind of practicing data scientists and you are familiar with all of these pieces, I apologize that it will be a bit slow for you and hopefully as we move along there will be more and more new stuff. I'm kind of hoping that for those of you who already have some level of expertise, we will continually give you ways that you can go further.
So for example, at the moment I'm thinking can you help us with these scripts to make them better, to make them simpler, to make them more powerful, to create Azure versions of them. All the stuff that we're doing to try and make deep learning as accessible as possible, can you help contribute to that?
Can you help contribute to the wiki? So for those of you who already have quite a high level of expertise, I'm really looking to make sure that there's always ways that you can push yourself. So if you're ever feeling a bit bored, let me know. That is a perfectly reasonable thing to say, hey I'm kind of a bit bored and I'll try and give you something to do that you don't know how to do and then you won't be bored anymore.
So at this point, I downloaded dogscats.zip and I unzipped it. If you're wondering about the -q, that's just because unzip otherwise prints out every single file name as it goes, so that's Q for quiet. So just about the most important thing for doing this kind of image classification is how the data directories are structured.
And in particular, you'll notice that we have a training set and a test set, and that's because when we downloaded the data originally from Kaggle, it had a train.zip and a test.zip. Keras, which is the library we're going to use, expects that each class of object that you're going to recognize is in a different directory.
So the one main thing I did after I downloaded it from Kaggle is that I created two directories, one called cats and one called dogs, and I put all the cats in the cats and all the dogs in the dogs. Because when I downloaded them from Kaggle, they were all in one directory and they were called cat.one.jpg or dog.one.jpg, so that was pretty straightforward.
So now if I ls train dog.one star, sorry, dogs/dog.one, okay, for example, or dog.tenstar. So there are, I don't know why there's 11,501, there's maybe 11,500 dogs in there, obviously on something weird, and then cats. So that's the number of dogs and cats that we have in our training set.
And so for those of you who haven't done much data science before, there's this really key concept that you have a training set and a test set. And Kaggle, being a competition, makes this really obvious. The files in the training set tell you what they are. Here is a dog, it's called dog.something.
But if I look in the test set, they don't say anything, they're just numbers. Why is that? That's because your job in this Kaggle competition is to say for 43.jpg, is it a dog or is it a cat? So there are 12,500 images in the test directory for you to classify.
Even if you're not doing a Kaggle competition, you should always do this yourself. In fact, ideally you would get one of your colleagues to do it without you being involved, to split the data into a test set and a training set and to not let you look at the test set until you've promised you're finished.
And Kaggle kind of enforces this. They let you submit to the leaderboard and find out how you're going, but actually the final score is given based on a totally separate set of data that is not scored. For me, before I started entering Kaggle competitions, I kind of thought that my data science process was reasonably rigorous.
But once I actually started doing competitions, I realized that that level of enforcing the test training split made me a much better data scientist. You know, you can't cheat. So I do suggest you do this in your own projects as well. Now because we also want to tune our algorithm in terms of different architectures and parameters and so forth, it's also a very good idea to split your training set further into a training set and a validation set.
We'll see a lot more about how this works, but you'll see in this case I've created another directory called valid, which has dogs and cats as well. So it's structured exactly the same. And here you can see that there are a thousand cats and a thousand dogs. So when I originally downloaded from Kaggle, there were 12,500 cats and dogs in the training set.
That's why in my training set there are 11,500 because I've moved a thousand of each of them to a validation set. So that's the basic data structure we have. Other than splitting things into test training and validation sets, that's the most important advice I have just as a data scientist.
The second most important advice I have as a data scientist is to always do nearly all of your work on a sample. A sample is a very small amount of data that you can run so quickly that everything you try, you get a nearly immediate answer to. This allows you to very quickly try things, change things and get a basic process running.
So I always create a sample with 100 or so items to just get started with. So you'll see I have a directory called sample and in that I have a whole separate train and valid. I did not move things there, I copied them there. The purpose of this sample directory is just to let me do things really quickly.
So you'll see inside sample train, we have cats and dogs, but this time there are 8. I probably should have put more in there. I think probably more like 100 would have been good, but I think at the time I was probably using a really low-powered computer for my testing.
But it's enough to check that my script is working. So now that everything is downloaded, you can see that I have -- and my Jupyter notebook has automatically noticed that it's changed. I'll get rid of these zip files. And I'll get rid of the Rachel's and Jeremy's notebooks that I was just playing with.
And we're ready to get started with doing some deep learning. So the goal for you guys during this week will be to replicate everything that I've done, initially just by making sure that this notebook works for you, but then to replicate it with another dataset. And so one of the things we'll do tomorrow is we'll post some ideas of other interesting Kaggle datasets you could try, and maybe other people can also post other interesting datasets they've found elsewhere.
So the idea will be to make sure that during the week, you can run your own classification process on some dataset other than dogs and cats. But first of all, make sure that you can run this. So as you can see in this notebook, I've used markdown cells. How many people have used markdown before?
So those of you who don't know, markdown is what we use both in the notebook as well as on the wiki. It's basically a way of really quickly creating formatted text. There's not enough of you that aren't familiar with it that I'm going to go into it in detail.
If you're not familiar with it, please Google markdown. And you can experiment with it either on the wiki or in your notebook. As you can see though, I've basically created cells with headings and some text, and during the week you can read through these in detail. As we mentioned, we're going to try to enter the dogs and cats competition.
So 25,000 labeled dog cat photos, half of each. 12,500 in the test set. And the goal is to beat 80%. As we go along, we are going to be learning about quite a few libraries. Not too many, but enough that for those of you that haven't used Python for data science before, it's going to seem like quite a few.
By the end of the 7 weeks, hopefully you'll be pretty familiar with all of them. One of the really important three is Matplotlib. That's because Matplotlib does all of our plotting and visualization. On the wiki, we have a section called Python Libraries. As you can see, we have our top three listed up here.
At the moment, there are just links to where they come from. I'm hoping that you guys will help us to turn this into a really rich source of information about places that you found lots of helpful staff answers to frequently asked questions. For now, if you're not familiar with one of these things, type the word followed by a tutorial into Google and you'll find lots of resources.
One of these things are widely used. Keras is a little bit less so because it's just a deep learning library and therefore relatively new. NumPy and Matplotlib and all these other ones, scikit-learn, scipy, there's lots of books about them, there's lots of tutorials about them, there's lots of videos about them.
Matplotlib creates plots. One of the things we need to do is to tell Jupyter Notebook what to do with those plots. Should it pop open a new window for them? Should it save them? So this sent Matplotlib inline says, "Please show our plots in the actual Jupyter notebook." So that's pretty much the first line in every Jupyter notebook that I create.
And here's the thing I told you about, which is sometimes I want to run stuff on a sample and sometimes I want to run it on everything. And so I make it really easy for myself by having a single thing called path which I can switch between the sample and the everything.
So for now, let's just do things on the sample. And so as I said, you should do all of your work on the sample until everything is working. So as you can see, each time I've done something I press Shift+Enter and it puts a little number after the 'in', showing that this is the second input cell that I've run.
Like every programming language, a large amount of the power of Python comes from the libraries that you use, and to use a library in Python you have to do two things. You have to install it and then you have to import it. In Python, I strongly recommend that you use a particular Python distribution called Anaconda.
And if you're using the scripts and AMIs we provided, you are already using Anaconda. You can check what Python you're using by typing which Python and it will tell you. You'll see that not only am I using Anaconda, but I'm using an Anaconda that is installed into my home directory.
So no screwing around with sudo or any of that business. Again, if you use our AMI in scripts, this has all been done for you. With Anaconda, installing anything is the simplest typing conda, install, and the name of the thing. And on Anaconda, everything's been pre-compiled, so you don't have to wait for it to compile, you don't have to worry about dependencies, anything, it just works.
That is why we very highly recommend using Anaconda. It works on Mac, it works on Windows, and it works on Linux. Lots of Windows users use it, very few Linux users use it, very few Mac users use it. I think that's a mistake because lots of Mac and Linux users also have trouble with compiling dependencies and all that stuff.
I suggest that everybody uses it. From time to time, you will come across something that does not have an Anaconda installer available, in which case you have to use pip instead. In our case, I think just Theano and Keras are in that situation, but neither of those need compiling anything at all.
So they're very easy to install. So once you've installed it by typing conda, install, whatever, and most things are already installed for you with our AMIs, you then have to tell Python that I want to use it in this particular session, which you do just by typing import and the thing you want to look at.
So I'm not going to go through all these libraries right now, I'll go through them as we use them. But one of the big three is here, which is NumPy. NumPy is the thing which, as our wiki page describes, provides all of our basic linear algebra. How many people here have some familiarity at all with linear algebra?
Nearly all of you, good. So if you're somebody who didn't put up your hand, I would suggest looking at the resources that Taro added to the wiki at the bottom here. So go back to the homepage and go to linear algebra for deep learning. Generally speaking, for any math stuff, my suggestion is to go to the Khan Academy site.
Khan Academy has really great videos for introducing these kind of simple topics. We just need to know these three things, mainly really the first two things for this course. And NumPy is the thing which gives you these linear algebra operations in Python. And as you'll see, it makes them extremely easy to use.
Pretty much everybody renames NumPy to np. So that's what import NumPy as np does. You'll find in nearly everybody's script on the internet, it'll be np.something, not NumPy.something. In general, we try to stick with the same kind of approaches that everybody else uses so that nothing will be too unfamiliar.
So we've imported some libraries that we need. We also try to provide some additional utilities and scripts for things that we think probably ought to exist but don't exist that make things easier. There's very few of them, nearly all of it is in one script called utils. There's a cool little trick which is that if you are using external script that you've created and you're changing it quite a bit, so now that you've got utils, feel free to add and change and do whatever you like to it.
If you import it like this, import utils, relude utils and then from utils import whatever you need, you can go back and rerun that cell later after you've changed utils.py and all of your changes will be there, available for you to use. So for now we're just going to use one thing from our utils library called plots, which you'll see used in a moment.
So our first step will be to use a pre-trained model. So what do we mean by a pre-trained model? What we mean is that somebody has already come along, downloaded millions of images off the internet and built a deep learning model that has learned to recognize the contents of those images.
Nearly always when people create these pre-trained models, they use a particular dataset called ImageNet. The reason that they tend to use ImageNet, or one of the key reasons that they tend to use ImageNet is because ImageNet has the most respected annual computer vision competition. So people that win the ImageNet challenge tend to be companies like Google and Microsoft.
A couple of years ago, it tended to be people who immediately then got hired by Google and Microsoft. ImageNet itself is fun to explore. If you go to ImageNet and go to Explore, you can check it out. And basically there are 32,000 categories. So for example, we can go to ImageNet, let's look at plants and plant life, let's go to crops, let's go to field crops, corn type crops, dent corn, so here we have a number of pictures of dent corn.
There are 397 of them. The folks that create these pre-trained networks basically download a large subset of ImageNet. The competition has 1,000 of these 32,000 categories that people compete on. So nearly always people just build models for these 1,000. I would be remiss if I did not mention the shortcomings of the ImageNet dataset.
Can anybody tell me something that they notice in common about what these photos look like or how they're structured? They're just one thing. If you look at an arbitrary photo, say from my photo album, you'll see there's a person here, a bridge there, something else here. ImageNet is carefully curated to be pictures of Flint corn.
These are like 312 pictures that are designed to be really good pictures of Flint corn, whatever that is. This is an easier problem than many problems that you will be facing. For example, I was talking to Robin from Planet Labs at a break about the work that they're doing with satellite imagery.
Their satellite imagery is going to have a lot more than a picture of a piece of corn, like a Planet Labs satellite. Where's Robin? How many pixels is a Planet Labs photo? A couple of million. So pretty big, and in that couple of million pixels you're going to have like what kind of area would that cover?
50 square kilometers. 500 square kilometers. So there's going to be tennis courts and swimming pools and people sunbathing and all kinds of stuff. So when Robin takes this stuff to Planet Labs, he's not just going to be able to use a pre-trained network directly. But we're going to show you how you can use some of the structure of the pre-trained network even if you are not looking at photos that are this clear.
Having said that, if you remember the slide I showed you earlier of the plant disease project, each of those plant disease pictures were very clearly just pictures of one thing. This certainly happens as well. But do be aware that when you're using a pre-trained network, you are inheriting the shortcomings and biases of the data it was trained from, and therefore you should always look at the data it was trained from.
So being aware of that, I would say that for us, this is going to be quite a suitable kind of dataset, and as we look at the dataset, you'll see why I say that. So each year, most of the winners of the ImageNet competition make their source code and their weights available.
So when I say their source code and their weights, the source code is the thing that defines -- remember I told you there are three bits that give us modern deep learning. It's the infinitely flexible function, it's the way to train the parameters, and it's the fast and scalable.
The particular functional form is what is the neural network architecture. We're going to be learning a lot about that. But that's the source code. So generally you download the source code from the folks that build the model. The second is the parameters that were learned. Generally an ImageNet winner has trained a model for days or weeks, nowadays often on many GPUs, to find the particular set of parameters, the particular weights that make it really good at recognizing those ImageNet pictures.
So you generally have to get the code and the weights. And once you have those two things, you can replicate that particular ImageNet winner's results. One of the winners of 2014 was the Visual Geometry Group. It's an Oxford University group. And so there's this model called VGG. You'll hear about it lots.
Generally speaking, every year's ImageNet winners, the particular models they used are so well used in the community that people call them by name. So the 2012 winner was AlexNet, 2014 was VGG, 2015 was I guess our conception, 2016 was ResNet, so they all have names. VGG is a couple of years old, so it's not quite the best today.
But it's special because it's the last of the really powerful simple architectures. We will get to the more complex architectures. Depending on how we go, it might be in this set of classes. If not, it will be in next year's set of classes. Hopefully this year's set of classes.
But VGG's simpler approach is not much less accurate. And for teaching purposes, we're going to be looking at something that is pretty state-of-the-art and is really easy for us to understand. So that's one of the reasons we're using VGG. Another reason we're using VGG is it's excellent for the kinds of problems that we were just talking about that Robin with his satellite imagery has, which is it's a great network for changing so that it works for your problem, even if your problem is a little different.
So there's a number of reasons that VGG is a really great thing for us to be using. My strong preference is to start out by showing you how to do things that you can use tomorrow, rather than starting with the 1+1 and showing you how you can do things that are useful in 6 years' time after you've got your Ph.D.
So I'm going to start out by showing you 7 lines of code that do everything you need. And to get to the punchline, the state-of-the-art for dogs vs cats in the academic literature is 80% accuracy. This gives you 97% accuracy. And you don't need to do anything else. For you after this class to see if you can get everything working, basically your job will be can you run these 7 lines of code.
And if you can, then you can rerun it on your own dataset as long as you structure the directories the way that I just showed you. So what I'm going to do is I'm going to go through these 7 lines of code, or something very similar to them, line by line and show you some pictures of what we're doing along the way.
I wanted to start by showing you the 7 lines of code though because we're going to be looking at all kinds of things along the way in order to really understand what's going on. And at some point you might start thinking, gosh there's a lot to do to do deep learning.
But there's not. There's a lot to do to really explain and talk about and visualize and think about deep learning. But for you to actually do image classification, you just need these 7 lines of code. So what does it mean to train a model that's already trained? Yes, you're getting a little bit ahead of us, but it's great to answer these questions many times.
So let's try and make a starting answer out of it. In this case, the VGG model has been trained to recognize photos of the 1000 types that are in the ImageNet competition. There's a number of reasons why that does not give us dogs versus cats. Reason #1 is that if we go into the animals section of ImageNet, here we are, animals, beings and beasts and brutes are domesticated, I guess.
Dogs, hunting dogs, sporting dogs, pointers, visla. So they have 2,332 pictures of visla, also known as the Hungarian pointer. So you could go through and run it and go back and find all the vislas and the German short-somethings and the setters and say they're all dogs, but that's something you would have to do.
So that's one shortcoming of the VGG approach compared to what we actually want. The second shortcoming is that sometimes it's going to get it wrong. It might get it wrong for really good reasons. For example, maybe this one comes back with snow. But in fact it's going to come back not just with snow, but it's going to come back with a probability for every one of the 1000 categories.
So it will be probability of 0.0003 that it's a mushroom and 0.0002 that it's an airport and 0.4 that it's snow and 0.3 that it's a German shepherd. And so we want to take advantage of all of that information as well. So what this actually does is it does something called fine-tuning, which we're about to learn a lot about.
And what fine-tuning does is it takes that pre-trained image model and says, "Use everything you know about the 1000 categories to figure out which one are cats and which one are dogs." That's a great question, and we're going to go back and talk about that a second time when we get there.
So this code is going to work for any image recognition task with any number of categories regardless of whether those categories are in ImageNet or not. And really the only image kind of processing image recognition that they're not going to do is something where you want to recognize lots of objects.
This is specifically for recognizing A+. So let's see how it works. So the VGG object, let's run this. VGG is not defined, so I need to from VGG import VGG 16. When something's running, it has a little star. You will probably get this warning that cuDNN is more recent than the one Theano officially supports.
So this is a good time to talk about some of the layers that we have going on. In this example we're using our VGG 16 class. It is sitting on top of, as we will see this in detail, Keras, which is the main deep learning library we're using and we'll talk a lot about.
Keras is sitting on top of Theano, which we'll be talking about quite a bit, but less than Keras. Theano is the thing that takes Python code and turns it into compiled GPU code. Theano is sitting on top of a number of things, broadly speaking, NVIDIA's CUDA programming environment. And part of CUDA is the CUDA deep neural network library, cuDNN.
For most important things in deep learning, Theano is simply calling a function inside cuDNN. So one of the things that we've set up for you in the AMIs and the scripts is to get all of this stuff stuck together and working. Keras is all written in pure Python, and what it does is it takes your deep learning architectures and code and turns it into, in our case, Theano code, and it can also turn it into TensorFlow code.
TensorFlow and Theano are very similar. They're both libraries that sit on top of CUDA and provide a kind of Python to GPU mapping, and lots of libraries on top of that. TensorFlow comes out of Google, and it is particularly good for stuff that Google really cares about, and in particular, running things on lots and lots of GPUs.
One of the things you'll hear a lot is you can't do anything with deep learning unless you have shitloads of data and shitloads of GPUs. That is totally, totally wrong, as you'll see throughout this course. It is true if you want to win ImageNet next year, you will need lots and lots of GPUs because you will be competing for that last 0.1% against Google and against Microsoft and against Baidu.
However, if you're trying to recognize 10 different skin lesions, like the folks that I showed you, they were the first people to try to do that with deep learning, and they quadrupled the previous state of the art using one GPU and a very small amount of data that they had hand collected.
So the reason you see a lot of this stuff about lots of GPUs and lots of data is it's part of trying to make neural networks call rather than uncall. It's trying to make it exclusive rather than inclusive. It's like unless you're us, you're not in the club. I really don't want you to go in for that kind of thing.
You will find again and again it's not true. As I've just shown you, in fact, with seven lines of code, you can turn the state of the art from a 20% error rate to a 3% error rate, and it takes about five minutes to run on a single GPU which costs 90 cents an hour.
I am not going to be talking much about TensorFlow in this course because it's still very early, it's still very new, it does some cool things but not the kind of cool things that uncool people need access to. Theano, on the other hand, has been around quite a lot longer.
It's much easier to use. It does not do multi-GPUs well, but it does everything else well. If you build something in Keras and you get to a point where you're like, okay, this is working great, we've got a 400% improvement in the state of the art, I want the extra 5% that comes from running this on eight GPUs.
It's a simple configuration change to change the back-end to TensorFlow, and specifically I want to show you that configuration change. You'll find in your home directory, so for those of you that haven't used Bash before, when you see tilde, that just means your home directory. In your home directory there is a .keras folder, and in there there is a keras.json file, and this is the configuration.
And you'll see here backend, theano, so if you change this to say TensorFlow and rerun it, it's now using TensorFlow. And TensorFlow will use all of your GPUs. If you do that, I also suggest changing this thing here that says th, which stands for theano, to tf that stands for TensorFlow.
We may talk about that in the next course, it's a pretty minor detail. The other configuration file to be aware of is the theano-rc. You'll find a lot of unix-y things are something-rc. I want to point out that there's a really important line here which is device=. This is either GPU or CPU.
If you're using a T2 instance, you will find that the AMI we've created has changed the G to a C. That's because the T2 instance does not support GPU. So if you want to switch from GPU to CPU, just change the G to a C or C to a G.
So those are the two configuration pieces that you may need to know about. For this class, you won't really need to know about those because everything's been set up for you, but I'd like to show you what's going on behind the scenes. So this warning that cuDNN is too recent, if you see any problems, try updating theano with ngrading cuDNN.
I haven't found any problems, so you can ignore that warning. It just means that we're using a more up-to-date version of cuDNN than the theano authors have tested. We create our VGG object. In doing so, there's a whole bunch of stuff going on behind the scenes. We're going to look at all of it.
By the end of the next lesson, you will understand every line of code in our VGG script. For now, I would just point out that you can look at it because you downloaded it, and inside it, you'll see there is 100 lines of code. So it's not very big at all.
So we're going to understand all of it by the end of the next class. For now, let's treat it as a back box. There's a pre-trained network, it's called VGG16. We now have a VGG object which gives us access to that pre-trained network. With deep learning, we don't look at images or data items one at a time, we also don't look at them a whole data set at a time.
We look at them a few at a time. And the number that we look at, or that little few that we look at at a time, we call either a batch or a mini-batch. A mini-batch is simply grabbing, in this case, images, a few images at a time, and the size of that is the size of the batch, and computing on all of those at once.
Why don't we do one at a time? The reason that we don't do one at a time is because a GPU needs to do lots of things at once to be useful. It loves running on thousands and thousands of things at the same time, because it can do all of them at the same time.
So a single image is not enough to keep your GPU busy and it's slow. Why not do all of it, the whole data set at once? Well first of all, your GPU only has a certain amount of memory, generally somewhere between about 2GB and about 12GB. And generally speaking, your data set is unlikely to fit in that memory.
And secondly, there's just no need to do the whole lot. Generally, pretty much everything you want to do, we can do a small amount at a time. So in this case, I'm just going to show you how we can look at the result of this BGG model. And so we're just going to do 4 at a time.
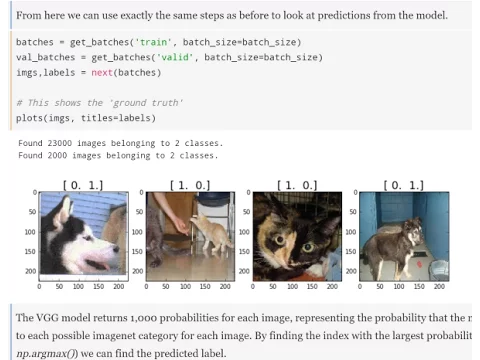
So there's a get batches command which basically says, in our BGG model, let's look inside the path that we've defined, and remember that path we made the sample path, and grab 4 at a time. So we've got an error, that's good. No such directory. Missing a trailing slash. So it's good to see these kind of errors, so we'll just go back to where we defined it, add our trailing slash, and go back down, and run it again.
So we're in the sample, so there's 16 images. So let's grab one batch. And so that's going to grab 4 images and 4 labels. So here are the 4 images, and here are the 4 labels. And so you can see that it's labeling it 0, 1 if it's a dog, and it will be 1, 0 if it's a cat.
So now that we've done that, so that's basically what our data looks like, we can call BGG.predict, passing in the images. And so that's now going to ignore the labels of what it actually is, and it's going to use this pretrained model and tell us what does it think the 4 things are.
In this case, if we run it, it thinks they're a rottweiler, an Egyptian cat, a toy terrier, and a rottweiler. So you can see it's clearly made a mistake here. It's very rare that actually I find it makes a mistake, so I'm glad it did make one. And you can see it must have been confused by all the awkward stuff going on in the background.
So it's also shown you for this one that's a toy terrier, here are the probabilities of each. It's only 24% sure that it's a toy terrier. So you can see that it does actually know that it's not a rottweiler, whereas the rottweiler is very sure it's a rottweiler. How come it's not so sure it's an Egyptian cat?
Well that's because there's lots of cats that look a little bit like an Egyptian cat. It doesn't quite know which one it is. So we could have a look at all of those details and see exactly which other ones it thought it would be. And we'll be looking at that in the next lesson.
So the final thing I'm going to do is to show you how we can take these probabilities and turn them into a dogs vs cats model. I'm going to do it quickly now and then I'm going to revisit this in the start of the next class since we're out of time.
So to take that thousand probabilities, so we're just showing one probability from each, but there's actually a thousand probabilities for each. This is the probability that it's a tench, it's a goldfish, it's a great white shark, so on and so forth. To take those thousand probabilities and turn it into a dog vs a cat prediction, we basically do exactly what we did before, just to say get batches, that we call fine-tune.
And what fine-tune is going to do is build a new model and replace the thousand categories with the two classes that it's found. And how does it know what the two classes are? Well that's because we have directories called cats and dogs. So the fine-tune command has now created a model that checks for cats and dogs.
Just creating the model is not enough, we have to actually run it, train it. So if we then go .fit, it will then use that gradient descent method that I talked about earlier, that propagation, and it will attempt to make that model better and better at determining cats vs dogs.
Now obviously doing it on just 16 data items is a) fast, but b) not very accurate. So I can run it a few times and you can see that the accuracy is actually getting higher and higher each time, but the validation accuracy is not getting much higher. And that's because I'm running it on the sample.
So if I ran it on the full dataset, it would take about 5 minutes to run and you try it when you get home, give it a go and see what accuracy you get. If you want to make the accuracy higher, just rerun this cell a bunch of times.
So that's the end of today's class. It's the class which is kind of like the opening of a novel when you have to introduce all of the characters and their backstories and stuff. So a little bit less deep learning goes on in the first class, a little bit more getting set up.
Your first week is likely to be the most frustrating and challenging week because many of you will find you've got some kind of configuration problem or you don't understand how some piece of the stuff fits together. Don't worry, by the end of the 7 weeks, that stuff is all going to be straightforward and all of the interesting bits will be in the deep learning.
So I think the more time you can put into this week, making sure that you get all of that infrastructure stuff working and comfortable with what it is, take all of the things I've introduced today, look at the video and go and Google all the stuff that you're not already familiar with, understand how it works, anything you're unclear about, ask us and your colleagues on the Slack channel, on the forums.
Teaching is the best way to learn, so go to the wiki and try to explain the things you've learned. Make sure that you can run the code up to here that we've seen today. For those of you who are pretty familiar with most of this already, make sure that you can run this code on a different dataset and we'll talk about some possible different datasets that you can use tomorrow.
Any of you that want to go further, please let Rachel or I know. We have lots of ideas for ways that you can extend this a long way. Thank you so much all for coming and I'll see you next week and talk to you during the week. Make sure that you've got your teammates' details so that you can all stay in touch.
Thank you.