How LSH Random Projection works in search (+Python)
Transcript
Okay, so we're on to lsh or locality sensitive hashing with random projection in the Previous video in a series if you're if you're following it, we covered lsh but we covered the more traditional version of it with shingling min hashing and lsh What we're covering here is I suppose more of like a uh a modern implementation of it and This is what you'll see in libraries like vice which we'll work through later on how to actually implement this in vice So what we're going to cover in this video is specifically lsh random projection We're going to work through a few visualizations to try and get a grasp of what it is actually doing And whilst we're doing that we'll also work through how we implement that in very simple python code for the vice Implementation of this which is obviously much more efficient than what we'll be covering in this video we will Cover that in another separate video to this because otherwise it's just huge a very long video So if you would like to see that i'll make sure there's a link to that in the description So let's just recap very quickly on You know, what is lsh?
So at the top here we have this first kind of row if you like Here we're minimizing collisions. So this is a hash function this blue bit in the middle And these are vectors on the left And we're passing through a hash function and it's making sure that we put both of those into separate buckets That's minimizing collisions lsh Tries to the opposite and what it does is maximizes collisions, but it only tries to maximize collisions for similar vectors Not just everything so lsh In short is a hashing function that tries to book it similar vectors together Now when we're performing search with lsh we Have all of our I would say database vectors indexed already.
So they've all been booked it imagine they've all been booketed And we introduce a new vector Which would be our query vector and we process that through the same booketing mechanism and we see where it lands and then Essentially what we can say is okay This has landed in this bucket and that means that the most similar Other vectors to it are the ones that are either in the same bucket or in the neighboring buckets so what it does is allows us to compress our vectors into low resolution vectors, which makes Our search a lot faster And that is what you can see here so we have our dense vectors at the top typically we're using dense vectors for this And they can contain hundreds or thousands of values and they're all typically floating point numbers so Memory wise it's pretty heavy And what we do is convert them into a very small Binary vector which is what you can you can see the bottom.
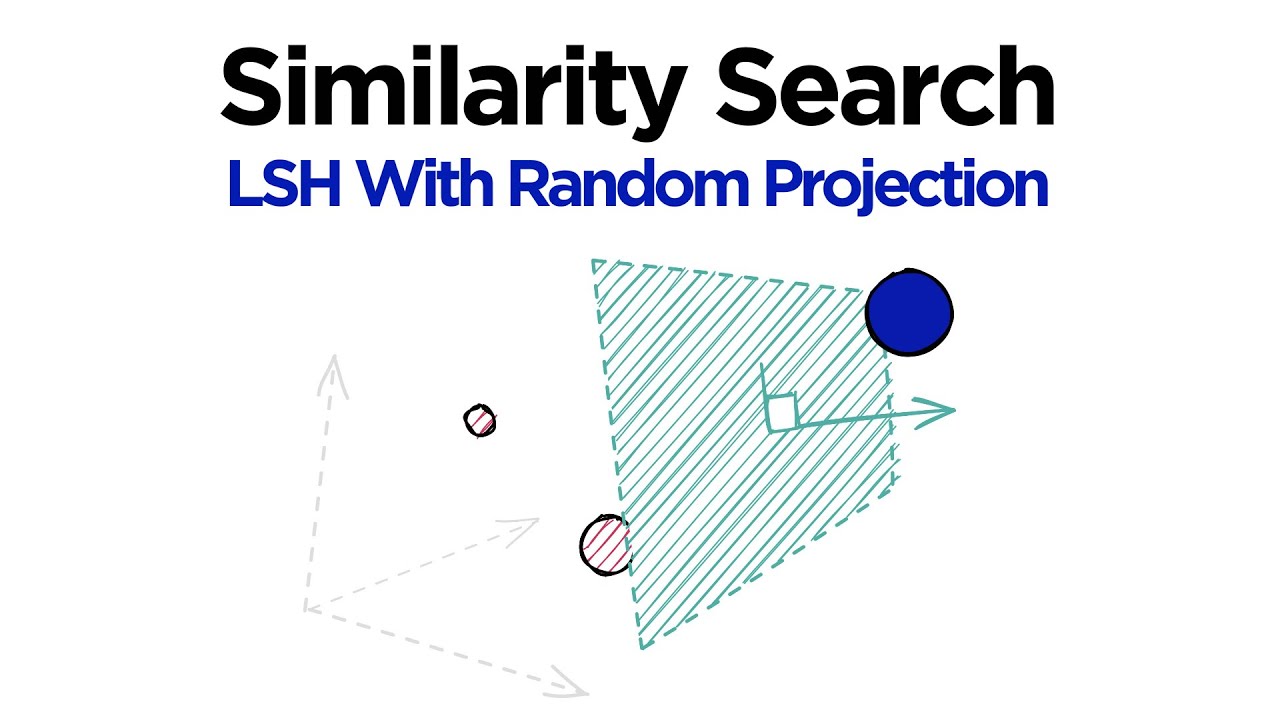
So it's a lot more memory efficient and Usually it should be faster to search although sometimes it can actually go the other way and it can And it can become slower to search than just comparing Um than just using a flat index now at the same time because we are approximating these vectors the search Accuracy is obviously going to decrease but what we want to do really is to maintain decent accuracy Whilst speeding up the search and our aim is using xq which is our query vector It is to return the k nearest neighbors As accurately as possible, obviously, we're approximating so it won't be perfect, but that's fine as long as you get a decent speed up now lsh with random projection works by splitting our vector space Which is obviously highly dimensional vector space using Hyperplanes, so I mean it's what you can you can see right here And the way that it works is that given A single hyperplane on the positive side of that hyperplane if your if your vector Appeared on that side It would be assigned a positive dot product value okay, and Then we would we process that and in our binary vector.
This would be assigned a one on the other side that you have the negative side of the Hyperplane and if your vector is on that side of it, it will be assigned a negative value with the dot product and with that in our binary vector would be assigned a zero and The reason that that works is we're using the dot product value.
So imagine this green line Down here imagine this is the hyperplane that I just showed you we have that normal vector The n that comes out here And using the dot product if the dot product finds that both of these are in the same direction eg anything In this sort of angle Then it will take that as a positive if it's on the other side, so Anywhere here it would take that as a negative dot product, which is what you can see over here now a single binary value isn't going to tell us much about the direction of our vector or the position of our vector so what we do is just add more hyperplanes in there, so we Add more hyperplanes and that gives us more binary values within our vector So what you can see here is we have those we have two hyperplanes now the magenta obviously correlates to the zero index in these vectors and then the teal hyperplane correlates to these ones the the number one indexes So What we would do is essentially just use loads of hyperplanes Which is kind of what you see here So these are the big arrows and the points that you see there the normal vectors so where we're actually calculating dot product and then These are our hyperplanes.
Okay, so here for blue we would get a value of zero And then here for example for blue we would get a value of one now let's Start building this out in in code so we can actually see How this works? So what i'm going to do is set the number of hyperplanes that we would like and we set that using a parameter here called n bits I'm going to say we have four hyperplanes just for this example in reality would use more But for now, we're going to go with four.
So we have four binary values here And all i'm going to do is um create our vector dimensionality as well. So we're just going to use 2d vectors To make it easier and so we can sort of visualize stuff as well So all we need to do is we're going to create the plane norms and they are going to be numpy random rand And the dimensionality there will be n bits and d So the number of hyperplanes that we want so n bits And the dimensionality that we're actually using And we're just going to minus 0.5 because we want them to center Around the zero the origin zero axis.
You don't need to do this. By the way It's it's just so we can kind of see the effect of it a little bit better Okay, and we get get these values Now those vectors don't align To this visualization, but it's essentially the same thing. What what we have done is we've created four 2d Hyperplanes or we've actually created four 2d normal vectors That we're going to use To build our binary vectors So we're going to create these Three vectors a b and c and what we're going to do is calculate the dot product for each one of those So then we know whether they are You know positive or negative behind each of our plane norms So to do that, we're just going to do np dot and then we just add our vector and we add plane norms And we just transpose those Okay, so let me Let's see what we get there Okay, so we see that we get negative negative positive positive.
Okay, so When we convert this into our binary vector, that will be zero zero one one Now we want to do this not just for a but also for for b and c so Okay Now what we want to do is say Okay, if it's negative it's zero if it's positive.
It's a one so to do that All we want to do is write a dot and we say Well greater than zero It's a it's a one so it's positive And we do that again for each one of our vectors Let's see what we get Okay, so now we get false false true true so the final thing to do there Although I don't you don't necessarily need to is just convert them.
In fact, we do need to uh purely to create our the the binary vector string so We'll see why in a moment. It's fine As type in so it's essentially easier for us to visualize That's it Okay, and we should get something that more looks like this here, um, so You see here obviously the values the the positions are slightly different But we have a is on the positive side of the teal hyperplane.
So one is of course One and then on c and b are both on the other side So they are of course negative now if we consider a b and c b and c kind of in the more in the In a similar position. So we would hope that they kind of align in there In the values that they have a bit better than them Um a but let's have a look see what we get Okay, so they're the same so that's good because they are Very much in a very similar place which you can see from here So a b and c in this case match up to what we're writing in the code.
It's just the hyperplanes are different Now it's these binary vectors that we use to create our lsh lsh buckets So what we're going to do is actually implement that just using a python dictionary to make it easy so What we'll do is i'm going to put each of our vectors A Dot b dot And c dot into this Vector list.
It's just so we can iterate through them a little bit easier I'm going to initialize our buckets which is going to be like I said a python dictionary And here i'm just going to set i equal to zero. So this Is just so we can loop through each of those each of those vectors So we're going to do for i in range length of Vectors, so yeah, we don't need either So the first thing we want to do is is create a hash string using the Vectors that we have up here.
So i'm going to do hash string equals i'm going to do Just join like that And what we want to do is join all of those numbers together, but we need to to join them as strings so run vectors i as type string Okay so if I Let me show you what that does hash string Okay, so we just get something like that now Then what we want to do is say if the hash string is not already within our buckets is not in Buckets our keys we want to initialize a new list so buckets hash string Equals a new list So we're initializing a list Essentially initializing a book.
It's put our vectors in So Initialize it and then after that we we just add we append it to that bucket So this is Essentially what we need let me Okay, yeah should it should be fine so let's print the buckets and see we'll get If hash string is What did I write there?
Not in there we go So now we see we have these two hash buckets And one and two have both been been put into the same one. All right, and that's essentially how Lsh what lsh works, but just on a much bigger scale so Now, let's say, you know, we we have our buckets and what we want to do is Give a new vector we want to Search using that I want to hash it and search.
This is our query vector xq So what we we see here So we've got like two examples one on the left is an example So this is we're comparing our query vector against two samples in our lsh buckets So xq is this zero it's been hashed zero one one one And what we do is first we compare it to This vector and we see and we're using hamming distance here, which is essentially, you know, do these two equivalent values match or not If they do it's what zero there's there's no distance between them If they do not match then the distance is one and then we add up all of the distance values at the end there so With this one none of them match.
So we get like one plus one plus one plus one, which is obviously four so the hamming distance between those two is four which is is And the biggest you're going to get with this dimensionality of binary vectors And then we have the second one and these ones match a bit better.
So zero is equal to zero one to one one to one so all those zeros and then so like zero zero zero and then this final one is one so then that equals one Okay So that's hamming distance And when we consider that with our code Over here We we also have to consider that there's a degree of A degree of information being lost because This is how we're storing the vectors.
We don't store the original vectors anymore. This is You know that essentially like final form in the lsh index, so Say we have our query vector and it comes through a zero zero one zero like great. We get a perfect match, but In reality, does it is it close to one or is it closer to we don't we don't actually know So we have to be careful when we're building our buckets To make sure That there's not too many items within each bucket We need them to be reasonably spread out but not spread too thin because if we spread them too thin across Too many buckets the the index becomes absolutely huge.
So it's is definitely like balancing acts between having enough buckets enough granularity in there to differentiate between a reasonable number of vectors But not too granular that we just make the index bigger Because then it's slower than just doing a flat search now What you what we see here is what we just discussed, right?
So given These two vectors a and b they're reasonably far from each other if we use a value of n bits value of two Our vectors are not big enough. They get booked it into the same place. We can't differentiate them But what we can do obviously increase the number of hyperplanes or increase n bits And then we can differentiate them.
So so for you know, these two here Exactly the same Uh buckets these are not we have differences here here And here so we can differentiate between them, which obviously is what we need But at the same time we are increasing the size of our index so it means we are becoming More accurate, but we're also getting slower.
So It's yeah finding the the middle ground between them both Now that's it for the implementation details behind vice What we'll do Is we're going to leave this video here and we'll cover Device implementation in the next video, which I will leave a link to in the description so you can find that easily But for now, thank you very much for watching and i'll see you in the next one