AngularJS end-to-end web app tutorial Part II
Chapters
0:02:57 Directives
5:12 Angular Documentation
16:0 Add a Default Search Order
23:10 Icons
23:49 Ng-Show
27:56 Pagination
30:10 Show More Method
31:38 Optional Success Callback
41:21 The Debugger in Javascript
Transcript
Welcome back to our series on creating a complete end-to-end web application using AngularJS on the front end, and a back end written in C#. We've also looked at a Python version of the back end. Remember the back end is very simple. All it does is take some data out of a database and serve it up using JSON to our front end.
It's in that client side where AngularJS does all the heavy lifting in terms of the logic display and so forth. And that's where the focus of these tutorials has been and will continue to be. So far, all we've managed to do is display a list of our todos. This is where we got to last time.
This list of todos is coming out of a SQL Server database, or if you're following through the Python version, it was a SQLite database, has been served up over JSON and displayed. We can see exactly how this is happening by looking at the network timeline. If I refresh, it gives us a really good sense of what exactly is happening here.
We asked for index.html. index.html, remember, consists of just a very small amount of code. All it does is it bring in some JavaScript. Our own JavaScript is amongst those. It brings in the bootstrap CSS and it contains a couple of attributes that tell Angular to display our templates within this.
So you can see that from index.html that is bringing in jQuery, Angular, bootstrap, our own application JavaScript, and the template we've requested. And then our controller has requested the list of todos from our API. So it said "get/api/todo" and that brought back all of these todos. That was then displayed in the template.
It was displayed in the template showing for each item the fields that we requested in a table. In the last tutorial we talked a bit about scope, which I said is one of or perhaps the most important part of Angular. I say perhaps because maybe even more important than that is the concept of directives.
So before we go into more detail around building the application today, let's discuss a little bit about exactly what directives are and why they're so important. You'll remember from our last tutorial that index.html, which brings in Angular and our application, causes two things to be attached to each root, both some code, which is in these controllers, and the actual HTML pages which are in these templates.
But what really is happening here? In particular, how is it that Angular can see things like ng-repeat in our template or ng-app or ng-view and make things happen? These are not attributes which are actually defined in HTML. How is Angular causing them to make stuff happen? Either by displaying things in a different way, by changing the HTML, or by adding behaviours through JavaScript.
Well what's actually going on is that Angular puts an event handler which gets called as soon as the DOM is completely loaded, and that event handler goes through all of our HTML, and in fact it goes through the DOM, and it looks for special tags or attributes or classes and special meaning that those tags or attribute or classes are things which have been registered with Angular as being special, as being things that we want Angular to handle.
And things which are registered in that way are called directives. Let's take a look at the Angular documentation. You can see at the very top of the Angular documentation is a list of directives, and you'll see there's basically two kinds. Some which are the same as existing HTML attributes or elements, and some which start with ng.
You'll notice that the ng ones use camel case, and if you look at ng-app for example, you can see that the way that these camel case names get used is by taking wherever there's a capital letter and lowercasing it and putting a dash between. So ng-app becomes ng-app like this.
So these directives are perhaps the most important foundational thing you need to understand to actually understand what Angular is doing and how it's working. And these ng versions are elements and attributes and classes which Angular has effectively added to HTML, and they each have their own behaviors. So for example, ng-click is something that allows you to specify custom behavior when an element is clicked.
Well, we've looked at ng-repeat already, so here's ng-repeat in the documentation. It instantiates a template once per item from a collection, so we've seen that used before. What about these ones which overlap with existing HTML? Well, what happens here is that the Angular directive causes the existing HTML behavior to slightly change.
So in this case, the Angular compiler goes through the DOM, finds all the a tags, and modifies them in some way. And in this case, it ensures that the default action is prevented when href is empty. Anybody who's programmed in JavaScript before will recognize that as being a pretty handy default behavior that it's created.
Well, actually default behavior that it's removed in this case. What's really interesting, I think, about Angular is that you are not limited to the directives that they've provided the Angular authors. In fact, you can add your own. Let's say I very commonly had a header which looked something like this, maybe it was greetings from somebody to somebody.
And maybe we want to now create something in HTML that can automatically build that using something like a greet tag. This is obviously a very silly example, but it's a very simple one to get the idea. So it could be greetings from Jeremy to audience. So how would we create that?
Well, interestingly, it really couldn't be more straightforward. There is something called .directive in Angular, and you can see I've got a template for it which basically includes all the bits I might want. So we create a directive called greet. And literally, this is now registered with Angular. It tells it any time it sees this, we would like to attach some special behavior to it.
Maybe let's make this a bit simpler and use it. Give. So we'll use it here. Okay, let's try that. So there's a whole bunch of things that we can do, but the very simplest one, let's get rid of everything except the template and the controller, because the very simplest one basically lets us insert our own behavior and HTML by having a template and a controller which is reusable.
So in this case, our template would be the contents of this, and we're going to replace these with these things in Handlebars. So we'll go from and something called from, and we'll call something to. So now that we've done that, it's as simple as remember these things are going to come out of dollar scope.
So let's put them into dollar scope. Dot from equals, and we can just grab the attributes and find the one called from, and dollar scope dot to, and we'll look at the attributes, and we'll find dollar attributes dot, I think we call it greet. So we've now got a controller, we've got a template, and let's see if that now has the behavior that we requested.
So we'll get rid of our H2, and so now all we've got here is a div in which we've got our own new directive. Let's try that, and you can see it's done exactly what we hoped it would do. Now that's obviously a very simple example, but you get the idea which is using nothing but this template and controller we can insert our own code and our own HTML by searching for our own special directives.
And with the other directive options that you can see here, you can actually put all kinds of other functionality. For example, this link is perhaps the one that's most commonly used that calls the JavaScript on the DOM element after it's being created, and that's where for example you could call a jQuery UI method or something like that.
And then we'll certainly come back and create some of our own directives that are more interesting than this later in this series. So for now, now that we've learned about really what's going on with Angular, which is to go through the DOM, finding special elements, special classes, and special attributes which have been registered with Angular, and giving them special behaviors.
These things have been called directives, and understanding that Angular comes with a whole bunch of these which gives us lots of really useful functionality out of the box. Let's now try and use some of this to add some functionality to our application. And we're just going to use pre-written directives for now rather than creating our own.
So at this stage, all we have is something which can display a list, and we want to add some additional functionality to it. We would like to be able to sort it, search it, and if it gets really long we'd like to be able to paginate it, so we don't pull everything down from the web every single time we look at this page.
So let's start creating that functionality, and let's get rid of our greeting. There we go. So the first functionality I'm going to create is sorting. Now, functionality like that, since it's working on stuff coming out of the database, needs to be handled in two places. It needs to be handled both in our web application in C#, and it also needs to be handled in JavaScript.
So the JavaScript is going to have to call a method to sort or search or paginate and handle what comes back, and our web application is going to be able to have to handle those parameters appropriately. Now, sorting, searching, and paginating is so common that Flask Restless actually does all of that out of the box, so we don't have to add any code to the Python version.
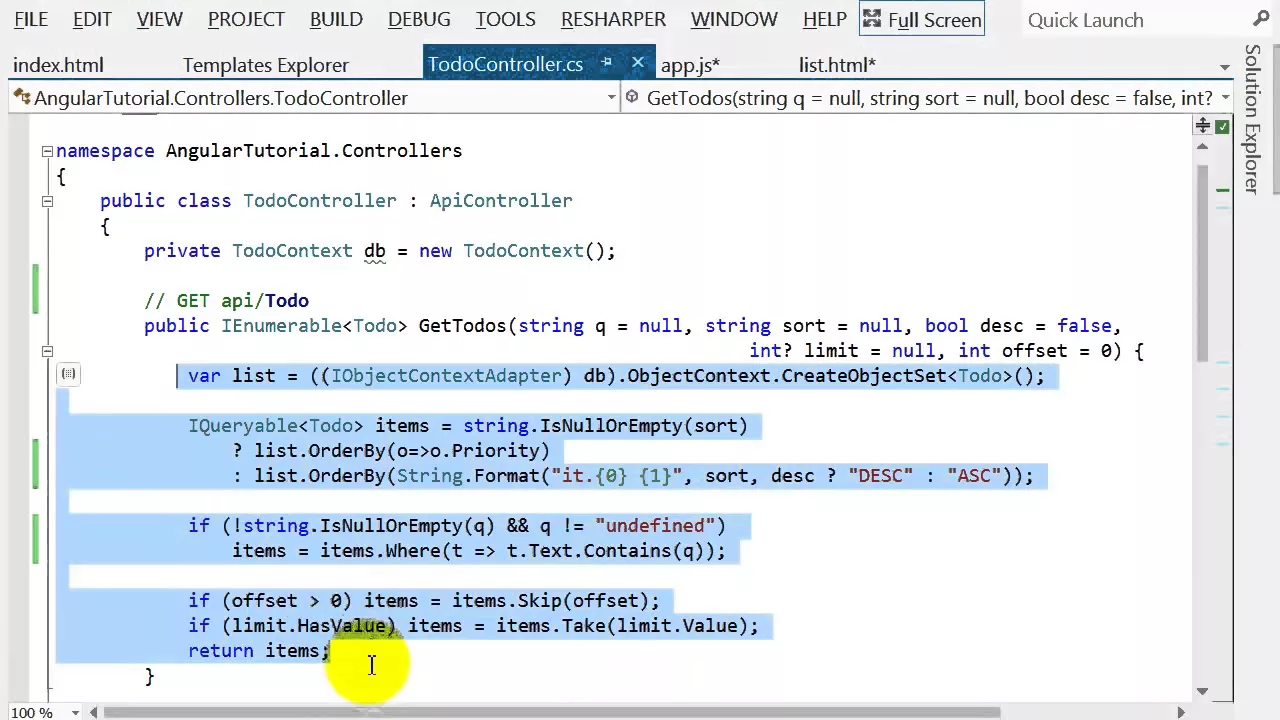
Unfortunately, however, Microsoft, although they also had all of that functionality out of the box in earlier versions of Web API, in pre-release versions, they actually took it out of the release version for some strange reason. So we're going to put it back in, and the way we're going to put it back in is we'll just go to my blog to part two, and you'll see here something called get to do items.
We're just going to copy that, and we're going to paste it into our controller, replacing the existing get API slash to do. So here it is here, and you can see that this has now got the functionality we've requested it can sort in ascending or descending order by a particular field.
It can have a search, and it can also paginate, in other words, it can limit to a certain number of records, and it can start at the nth record with this offset parameter. It's not very much code, it's just eight or ten lines, although it's slightly... well, it's not the most elegant-looking code, but it does the job, and it's nice that we can do it in so little code.
So until Microsoft gets around to adding that back to Web API, we're going to have to modify Microsoft's code each time we create a new controller, just pasting in this, and of course you'll need to change the class name to your class name. So now that we have that, that's the only change that we need to make in C#.
We now need to make some changes in the JavaScript to actually get this to do something. So since we're doing sorting, we need to pass in a sort parameter, and the isDescending parameter. So let's try and start as simply as possible, and that would be to add a default search order.
So let's say to start with we're going to... so we're obviously going to need two things in dollarscope, one for the order and one for the direction. So let's create order, and let's by default sort by priority, and let's also do direction. So we could say sort underscore direction.
Actually let's call it isDescending. That's a bit easier since really it's a boolean, isn't it? So isDescending, and let's use false for that. So it sorts by ascending, so lower numbers will be considered more important. I think that seems reasonable. So now that we've set those, we're going to need to make sure that we actually pass in these things to our web API.
So at the moment we're not passing in anything at all. So how do we pass things into our web API? Well, let's check the Angular documentation, and remember that the actual API on the client side, we're using this thing dollar resource to call it. So let's find out how dollar resource works.
So if we scroll down through the dollar resource documentation, we eventually get to what it returns, which is something that we can call get save query etc. And here we can see that for the get actions, the first thing that we can pass in is parameters. Here's an example of it here, a parameter name and a parameter value.
So in our case, our parameters are sort and desk. So let's pass in sort, and that's going to be dollar scope dot sort order, and then we've got desk, which is going to be dollar scope dot is descending. So we've set them, we're calling them, in the controller we are doing something with them.
You can see here, if sort is not null or empty, then we order by with the appropriate descending or ascending. So that should be everything that we need. So let's see if we now have that working. So we can see we've got a problem, desk equals undefined, and sort equals undefined.
So let's find out why it is passing in these unhelpful things. And here's the problem, we're calling search before we've set them. So let's move that to the bottom, and really we're always going to want that at the bottom. That's great, so here we've got it sorted by priority.
So the next thing we want to do is we want to make it possible to click on a header and have that change the sort order. So let's think about what that's going to do. So we're going to have a function that the HTML template will call, and that means that that function needs to be inside dollar scope.
So there's going to be a function, let's call it sort, and it's going to take in the parameter which is what column do I want to sort by. Let's call that column, and I think what we want to do is have it, so if you click on it once, then it will sort ascending, and if you click on it again and again, it will just change the sort again and again.
For now, let's just get it so it sorts ascending every time. So we're going to now go dollar scope dot sort order equals that column, and now after we sort, we're going to have to recall search. Okay, so we've set the sort order to the thing we've been passed, so now we just need to make sure that clicking on a column will actually call this method.
So since it's inside dollar scope, that means that we should be good to go. All we need to do is add a a tag. We don't need an href, what we need is a ng-click, and we need to call sort. So in this case it will be sort by, let's check what it's called before I type that, sort by text.
Okay, so the first column is called text. Well of course I could have seen that down here easily enough, couldn't I? Anyway, that's fine. So sort by text. So let's now refresh this. We can see this is now hyperlinked. Let's try clicking it, and we can now see that it's sorting.
It's sorting in a slightly strange order just because I filled it with numbers, but normally we would have text in here, not numbers. This is actually meant to be the description of the method to do. So each time I click on it, I wanted to change order. So let's do that.
So in other words, what I'm saying is if these two are already exactly the same, then what I want to do is simply change the direction. So to change the direction, let's just reverse is descending. Otherwise, let's set the sort order and set the direction to being ascending. Let's try that.
So the first time I click it, yep, the second time, yep, that's great. Okay, so that's done everything I want there. So the only other thing I might do is to make it so that a little icon will appear telling me which direction I am sorting in. So icons are rather conveniently available inside Bootstrap.
So let's start by finding an icon that we like. So to show icons in Bootstrap, you simply use the "i" tag and you give it a class of icon and so we're going to have to have an arrow down and we're also going to have an arrow up. Now we need to display these depending on whether or not something happens.
So we're going to have to wrap them in a span and we're going to display them or not depending on whether something is true or not inside Dollascope. So to do that we use ng-show and that simply takes an expression that will evaluate to true or false. So in this case we will show this if, let's have a think about that, so we'll show that if sort order is to do and also sort or is descending and since this is down that would be true.
And we have basically the same thing for the other one except of course this now becomes false. So let's try that. So currently there's no icon shown because we're not sorting by to do and now that I've clicked on it oh it's still not showing. Let's try and figure out why.
Oh because of course it's not called to do is it it's called text. Let's try it now. Okay so the first time I click and then there we go the second time I click that's great. So we can now use that for, in fact we can basically use that whole thing for each one of our column headers.
So this one's going to be priority and then the last one is going to be due date. There we go. So hopefully what you're thinking at this point is that seems like a whole bunch of duplicate code and you would be right. So what I've actually done in the written version of this tutorial is I've shown a directive which automates all of that.
We're not going to write it now but let's just take a look at it and then you can try this for yourself. So you can see we've done basically what we had last time which is we had a template which does all that stuff and in this case they've also pulled out the logic around whether to show or not into a scope method and then in the controller we define do sort and do show.
So it's really pretty straightforward to turn that into a directive. In order to save a source of time I won't do that now and have you watch me but I'd love you to see you try it for yourself. So I've just refreshed we can now see this is showing correctly that's very good and if we click it twice.
So one of the nice things here is I love the way even when I refresh so I haven't clicked anything and my default sort order is priority. Angular has automatically figured out that it needs to put this arrow here because this ng show directive it's automatically figured out when it has to check that.
So all this kind of dependency management around when do you have to test for the truth of things or when do you need to run the things it's all handled automatically and that's certainly something that I look for in an MVC framework and Angular does that really nicely. Great so we have sorting working.
What should we do next? I think for our next thing we might do pagination. So pagination we need to have an offset and a limit and each time we get more we're going to have to append it to our previous list. I should mention the kind of pagination I'm doing here.
I'm not going to do that old-fashioned style of pagination where you get a whole list of pages at the bottom from like one to a hundred and you click which page you want. I much prefer the approach to pagination which is you can basically ask for more items to be shown.
This is done for example in infinite scroll type frameworks where as you get to the bottom it automatically loads more or else there could just be a hyperlink which asks to show more. I'm going to use the hyperlink approach for now just because it's going to be a little bit easier to explain.
So let's put a hyperlink at the bottom and so again we're going to have a ngClick and that's going to do a showMore. Now we need to write that of course and then some text for it. It's an equal sign there of course. Great. So we've got something to click on that's basically all we need to do on the template side.
We need to now create this showMore. So if you think about it logically what is showMore going to do? It is going to be such that each time you click on it it's going to load another however many, let's say 20, another 20 things out of JSON API and going to append them to whatever is already displayed.
So whatever is already displayed is called $scope.items. Now again let's put some defaults here. So how many things to load at a time? Oopsie dozy. Let's call it limit. Let's say 20. Okay and then we have what's the offset to start with? Now of course that's going to be 0.
So we now need to create our showMore method and so let's do that. Now because we're calling it from the template that means it needs to be inside $scope. So $scope.showMore doesn't have any parameters. So what do we want to do here? Basically we want to go the offset should be equal to whatever it was before plus another 20.
And then after we do that we now want to rerun our query basically to query some more. So that is called $scope.search at the moment. There we go. So the next thing we need to do now is to use these offset and limit parameters inside our query. Now interestingly though what we want to do now is not just go $scope.items= to do .query.
We actually want to wait for the query to finish running and add those items to the end of what we already have. So if you look at the $resource documentation on Angular you'll see that actually you can have this optional success callback. So we don't have to say in fact you can see it used right above.
You don't have to say actually let's just look here. You don't have to say left-hand side equals the result of the query. Instead you can say run the query and when it's finished call some function and that's where we write this function. So it's going to be passed the actual data that it's received and that's where we can do something with it.
So to have it just continue to work as before it just be like so $scope.items= whatever data we were given before and that will continue to work just like it used to. But we actually want to do something else now. We actually want to say OK, pass in our offset and pass in our limit.
And so now we're going to be given an extra 20 items that we want to add to the end of $scope.items. So we now need to not replace it but concatenate it with our new data. So this time we should only get 20 back. However we have a problem which is currently we're trying to call concat on something that's empty.
So let's make sure we started out not being empty. OK, let's try it again. That's better. You can see we just got 20 this time. Let's try clicking show more. That's great. So now we've got 40 and show more again. Now that's actually only have 50 in here. So one nasty thing with this UX that still says show more when there's no more to show.
So hopefully you can figure out pretty easily how to get rid of that. All we need to do is add an ng show and let's create something called hasMore. So how do we know if there's more? Well more or less we could basically say well if we manage to pull back at least 20 last time.
Sorry if we manage to pull back exactly 20 last time then there's probably more. So let's say that to start with it's going to go more equals true. Let's create the function hasMore. I mean maybe this is overkill. Maybe we hardly even need a function but never mind. So we'll just go return more.
So I guess we probably could have done without a function at all. That's OK. That should be inside dollar scope of course. And now we need to check to see whether we got at least 20 items or not. And if so we will say that there's more to get.
So we could say here more equals data.length equals 20. OK let's see how that looks. So refresh all that. So this is showing that's good. Still showing that's good. That's great now it's disappeared. OK so that's going pretty well. So we now have pagination working nicely and we now have sorting working nicely.
So the only other thing we need to add is search. So if you look at the bootstrap documentation they actually have a nice little example of how to create a reasonably nicely styled search form. And so I've actually turned that into a template. So I'm just going to use that which is my bootstrap search template.
I've also put some basic stuff in here for my NG click as well. So your search template can really look pretty much the same every time until you want to get more sophisticated with styling it. Let's have a look at what's in the template. So it's a form with the appropriate bootstrap classes to make it look decent.
And the actual input box where you're going to type the search it has an NG model of query. So in other words anything that we type into this is going to end up inside dollar scope query. And I think we put into dollar scope query is going to end up in this text box.
And rather nicely the submit the reset button we have set to be disabled if not query. In other words it's disabled if there is nothing typed into the query box or more precisely if there is nothing inside dollar scope dot query. So in fact I just wanted to show that even without adding any JavaScript we already have some neat behavior which is look that's currently disabled and as soon as I type here it's enabled and as soon as I delete all the characters it's disabled.
So you can see with the angular directives you can actually do quite a lot even without any code and have everything work quite nicely. And of course you can add your own directives to add your own functionality again so that you your designers and so forth can actually add functionality to your applications without having to write any code.
I think that's really cool. So in this case when we click on the search button we're going to call something called reset. And when we click on the reset button we're going to call something which is basically to empty out the query and then call reset again. So let's write reset.
So what's reset is going to do is it's going to it's going to really start again in terms of what's displayed. So if I've pressed show more a bunch of times and then I do a search then I really probably only want to show the first N of that search.
So I'm going to grab all of this stuff here and I'm going to move it into reset. There we go. And when I've done all those things I'm going to call search. So that's basically all I mean by reset. And so now rather than calling search here I can call reset.
There we go. I think as you change searches we should probably leave the sort order as it was so I'm not going to move that inside reset. We're just going to set everything up from scratch. Now we actually want of course to make sure that we do a search.
Now you remember that inside our control our controller we had this parameter called Q and that is the thing that if it's defined we're going to call dot where on it. So we need to stick something into Q. What is that something? It's dollar scope dot query. So let's try that shall we.
So here we're going to add Q and we're going to set it to dollar scope dot query. I don't know that we need to do anything else at this point. We've defined what dollar scope dot query is from our template. We've pasted in the controllers doing something with it.
So hopefully we're going to be right to go at this point. So let's try it shall we. Let's search for 6. Nothing happened but there's no error either. Let's find out why not. So if I go to the network tab and click search again. Okay so currently our search button is not actually doing anything.
Let's find out why not. First of all we'll check our template and there is in fact an NG click connected to it so that's good. And then we do have a dollar scope dot reset so that's good. At the end of that it calls a search so that's good.
So let's try and figure out what's going on by using the debugger in JavaScript. Let's make sure we actually get to dollar scope dot reset shall we. I'm just doing a refresh first and then I'll type something into search and click. Okay so something's happening that's good. Let's try it.
So we step step step step step. Let's go into search. Oh that's interesting this time it did work. Perhaps I just forgot to refresh last time. So let's take the debugger out, save it, do a refresh and let's try it. Search. Oh there we go. So just all that happened last time was I forgot to refresh and therefore I had my old version of the JavaScript.
Let's try reset. Oh that's great. Let's try doing a sort and then do a search. That's great that's continued to work as well and let's try doing a search and then a sort. That's interesting. So in this case when I clicked on the sort header it's actually added to this and that's a bug.
And if you think about it the reason that's a bug is because I am NOT doing my reset after I did my sort. So let's change that so that it does a reset here. So in other words each time I'm doing something that's not show more I actually need to start again and not append each time.
Let's try that. Do a search and then a sort. Great. Do a reset. There's no show more here because there's only five things to show. Do a reset. There's a show more. Let's make sure it's all show more works. Looking good. Once more and no more to show. That's great.
So we're now at a point where we have successfully got search and sort and pagination working and we did that all from scratch in I think well under an hour if I'm counting correctly. And I think that really shows that once we've got the basic infrastructure in place it just gets faster and faster to add additional functionality to our application.
I'm going to leave this tutorial at this point because I think we've got more than enough to keep this going for now. See if you can follow through with this and create add that functionality to your own application. Of course don't forget that you can follow through the written tutorial and tutorial 2 in the written tutorial goes through all of these steps.
As this points out in the next part we're going to look at creating deleting and updating items and as you'll see it's going to just keep getting easier and easier and easier. Thanks very much for listening and of course feel free to leave comments either on my blog post or on YouTube with this video and let me know what you thought or if you have any questions.